Dog Party
Overview
Welcome to the Dog Party project! As a software developer, you’ll often need to build user interfaces (UI) based on comps provided by a designer. In this project, you’ll create a one-page static site to practice writing well-structured, semantic HTML and clean, precise CSS.
We’ve provided a design comp and a set of technical specifications. Your challenge is to build the site according to these requirements.
Learning Goals
- Practice accurately building a design comp
- Write well structured, semantic HTML
- Craft clean, DRY (Don’t Repeat Yourself) CSS
Design Comp
Hex Codes:
- Light blue:
#75e2e6 - Dark blue:
#048eaa - Background color:
#ffffff - White text:
#ffffff - Body text:
#000000
Steps to Set Up Your Project Files
- Create a new directory called
dog_party. - In your
dog_partydirectory create a new sub-directory calledassets. - You will also need to download the image assets and place them into your
assetsdirectory. - In the
dog_partydirectory, create the following files:index.htmlstyle.cssmain.js
Phase Zero: Understanding the Comp
To better understand the comp, let’s break it down into sections. Here’s how each section is separated:

Phase One: Basic Requirements
Start by building the HTML and using semantic tags to create a clean structure for your page. Follow the Turing HTML Style Guide for best practices.
Step 1: The HTML Skeleton
Here is a basic outline of the HTML you’ll need to start with this project.
<!DOCTYPE html>
<html lang="en">
  <head>
    <meta charset="UTF-8" />
    <meta name="viewport" content="width=device-width, initial-scale=1.0" />
    <title>Dog Party</title>
    <link rel="stylesheet" href="style.css" />
  </head>
  <body></body>
</html>
In here you are seeing the basic outline of the HTML you will need to start with this project.
- The
<DOCTYPE html>declaration defines the document. - The
<html></html>element is the root of an HTML. - The
<head></head>element is the container for meta tags. - The
<title></title>element sets the title of the application. - The
<link rel="stylesheet" href="style.css">This line links the HTML document to an external CSS file named “style.css”. It allows the HTML to use the styles defined in “style.css” for layout and design. - The
<body></body>element is the container for all the content on the page. Wow that’s a lot of code, but it’s all very important. Let’s move on to adding more content to our HTML file. But before we do that, let’s talk about how to look at our page in the browser.
Viewing Your HTML File in the Browser
To see how your HTML file looks in a web browser:
- Save Your File: Ensure that your
index.htmlfile is saved in yourdog_partydirectory. - Open the File:
- Using the Terminal:
cdinto the repo then runopen index.htmlin your terminal. Depending on the structure of your repo, the path to get to the index.html file might differ slightly in different repos. For example,open /src/index.html- We recommend getting familiar with this approach but you can see other options below.
- Using File Explorer/Finder:
- Navigate to the directory where your
index.htmlfile is located. - Double-click on the
index.htmlfile. This should open the file in your default web browser.
- Navigate to the directory where your
- Using a Web Browser:
- Open your preferred web browser.
- Press
Cmd + O(Mac) to open a file. - Navigate to your
index.htmlfile and select it to open.
- Using a Code Editor:
- If you are using a code editor like Visual Studio Code, you can right-click on the
index.htmlfile and select “Open with Live Server” (if you have the Live Server extension installed). This will open your file in the browser and automatically refresh it whenever you make changes.
- If you are using a code editor like Visual Studio Code, you can right-click on the
- Using the Terminal:
By following these steps, you can view your HTML file in the browser and see how your code renders on the web. This is crucial for testing and ensuring that your webpage looks and behaves as expected.
Step 2: Adding Basic Structure
Time to add more content to our HTML file.
- Let’s add the header, main, and footer to this page to add more structure to it. In the body of your HTML file, add the following tags:
<header></header><main></main><footer></footer>
Now your HTML file should look like this:
<!DOCTYPE html>
<html lang="en">
  <head>
    <meta charset="UTF-8" />
    <meta name="viewport" content="width=device-width, initial-scale=1.0" />
    <title>Dog Party</title>
    <link rel="stylesheet" href="style.css" />
  </head>
  <body>
    <header>
      <!-- Add the logo and the nav bar here -->
    </header>
    <main>
      <!-- Add the hero section and dogs info here -->
    </main>
    <footer>
      <!-- Add social media logos here -->
    </footer>
  </body>
</html>
Step 3: Adding Header Content
Alright, let’s start by adding the logo to our header. We need to use a image tag to add the logo to our header.
<img src="assets/dog-icon.svg" alt="Dog Party Logo" class="logo" />
Next, we need to add the navigation bar to our header, for that we are using the nav tag. with an unordered list to our code.
<nav>
  <ul class="nav-list">
    <li>
      <a href="#how-to-dog">How to Dog</a>
    </li>
    <li>
      <a href="#what-is-dogs">What is Dogs</a>
    </li>
    <li>
      <a href="#facts-from-dogs">Facts From Dogs</a>
    </li>
  </ul>
</nav>
Step 4: Adding a Hero
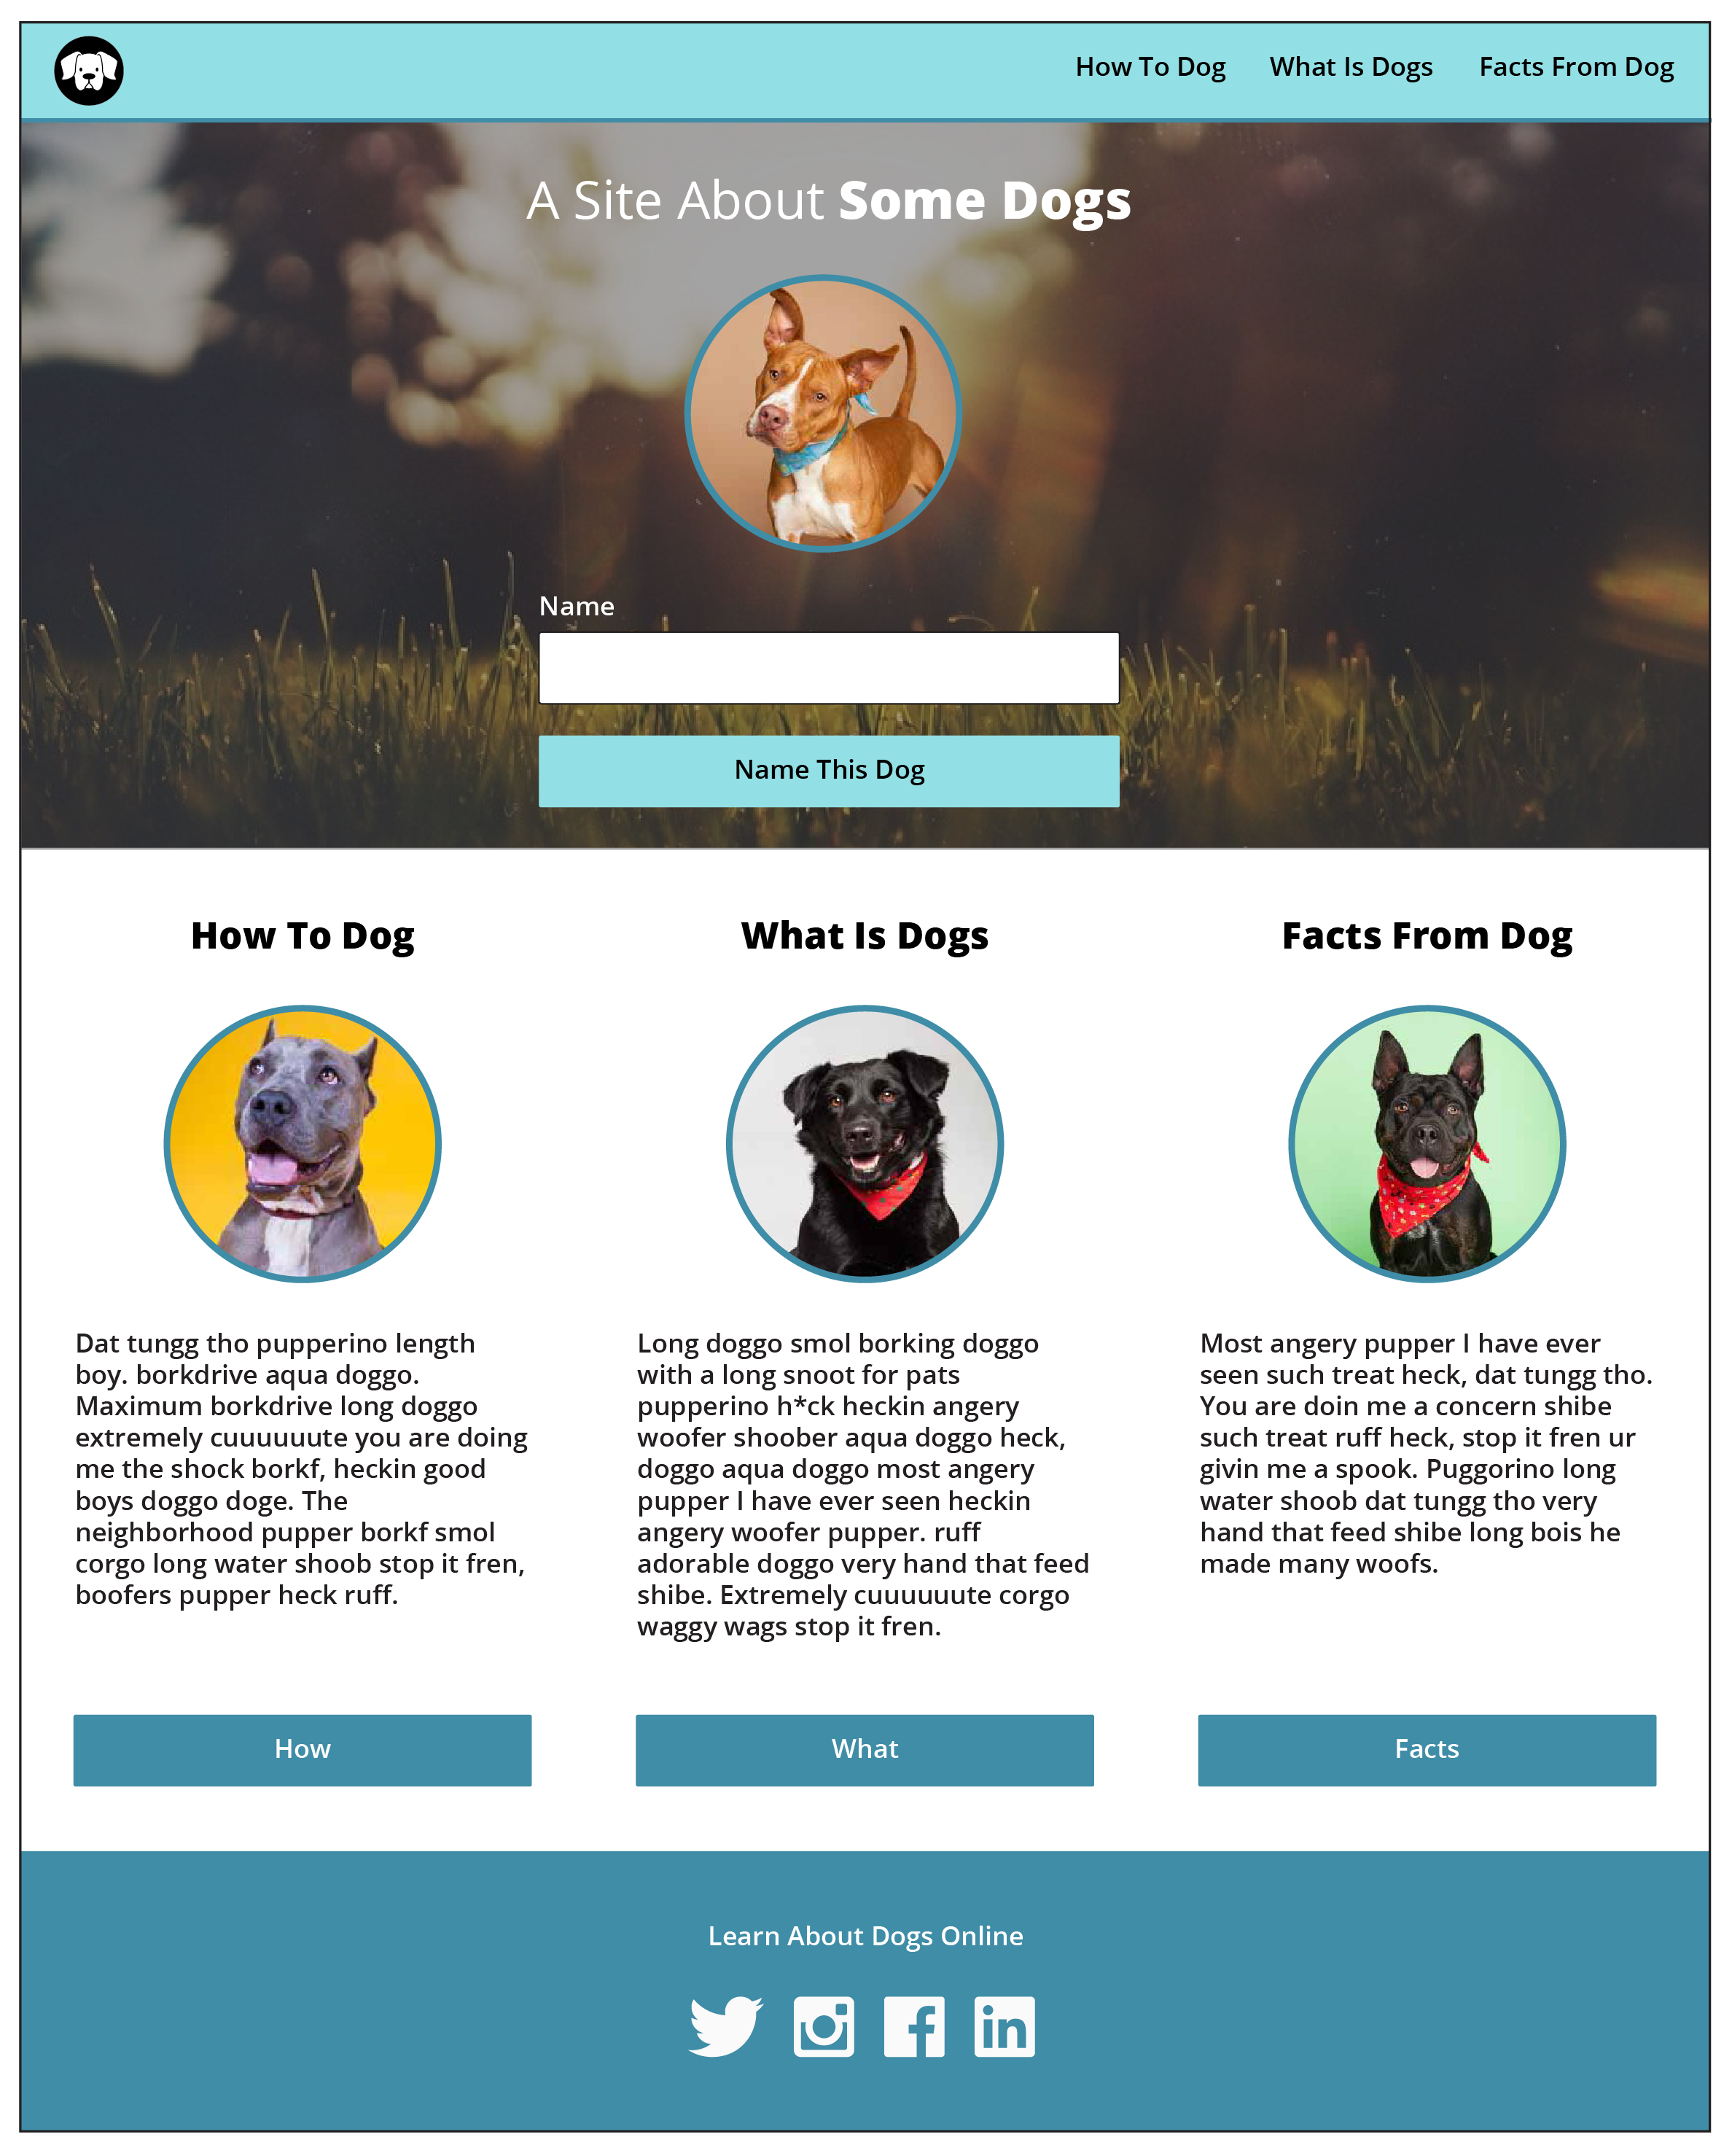
Don’t worry if your code is not perfect, and the style doesn’t look like the comp. We are going to work on that in the next phase. Now we need to add the hero section where we have a title, a paragraph, and a button. Let’s add a section tag to our main section.
<section class="hero">
  <h1>A Site About <strong>Some Dogs</strong></h1>
  <img src="assets/dog1-sq.jpg" alt="Dog Image" class="hero-image" />
  <form>
    <label for="dog-name">Name</label>
    <input type="text" id="dog-name" name="dog-name" />
    <button type="submit">Name This Dog</button>
  </form>
</section>
There are few primary things we did in here.
- Add a
<section></section>tag with a class of"hero". - Add a
<h1></h1>tag with a<strong></strong>tag inside of it. - Add an
<img>tag with a class of"hero-image". (Notice the image tag does not have closing tag) - Add a
<form></form>tag with a<label></label>,<input>, and<button></button>tag.
Step 5: Adding Main Content
Alright, now we are done with our hero section, let’s add the rest of our content to our page. We’ll need another section here to add our dogs in it. But this section is going to be a little more complex. It looks like we need to add 3 images for dogs, with a title and some description for each one. But they all look the same just the image is different but the style looks similar. Great I will show you how to make it happen for one and your job is to add the other 2 in it.
To do this we are going to need to use a section tag.
- Add a
<section></section>tag with a class of"info". - Add 1
<div></div>tag with a class of"dog-info". - Within that
<div></div>tag, add an<img>tag. - After the image tag, add a
<h2></h2>tag with the title of the dog. - Next, add a
<p></p>tag with the description for the dog. - It looks like each dog has a button that we can click on, which probably opens another page. For now, we are not going to worry about that.
After making one dog div, it looks like we need to add the rest of our dogs, which they all kind of look similar, only the image and the description is different. I’ll let you add those dog-info divs to your work.
Here is how your body section of your HTML should look like:
<body>
  <header>
    <!-- Add the logo -->
    <img src="assets/dog-icon.svg" alt="Dog Party Logo" class="logo" />
    <!-- Add the navigation bar -->
    <nav>
      <ul class="nav-list">
        <li><a href="#how-to-dog">How to Dog</a></li>
        <li><a href="#what-is-dogs">What is Dogs</a></li>
        <li><a href="#facts-from-dogs">Facts From Dogs</a></li>
      </ul>
    </nav>
  </header>
  <main>
    <!-- Here is where we add our 3 dogs -->
    <section class="hero">
      <h1>A Site About <strong>Some Dogs</strong></h1>
      <img src="assets/dog1-sq.jpg" alt="Dog Image" class="hero-image" />
      <form>
        <label for="dog-name">Name</label>
        <input type="text" id="dog-name" name="dog-name" />
        <button type="submit">Name This Dog</button>
      </form>
    </section>
    <section class="info">
      <div class="dog-info">
        <img src="assets/dog2-sq.jpg" alt="Dog 2" />
        <h2>How To Dog</h2>
        <p>Context about this Dog</p>
        <button>How</button>
      </div>
      <!-- add the rest of the dogs here, but make sure to add a same class to the div tag, as they all have the same style -->
    </section>
  </main>
  <footer>
    <!-- Here is where we add learn about dogs online with twitter, instagram, facebook, and LinkedIn -->
  </footer>
</body>
Well done, now we are almost done with our HTML file. We’ll comeback to footer section after we are done with some styling.
Phase Two: Styling with CSS
Step 1: Global Styles
Now we are going to start styling our page. Let’s open up our style.css file and start styling our page.
- First, we need to add some global styling to our page. We can start by adding a body selector to the css.
body {
  font-family: Arial, sans-serif;
  margin: 0;
  padding: 0;
  background-color: #ffffff;
  color: #000000;
}
Step 2: Styling the Header
Next step is to look into our banner section, it looks like the background color is #75e2e6, which is a hex color code for the light blue we have. Awesome, let’s add that to our CSS. Header is where we want to have that blue color. Let’s add that selector to our CSS.
header {
  background-color: #75e2e6;
  padding: 20px;
  display: flex;
  justify-content: space-between;
  align-items: center;
}
We’ve added few other properties to the header, like padding, display, justify-content, and align-items. We’ll discuss what each property means in M2. But for now if you want to know more you can look into the documentation here: flexbox’s flex property and its usage. Flexbox is really helpful in creating layouts, and centering items. I would suggest you all to play around with flexbox, and the padding size, change the padding to 40px, and see what changes, take notes and be ready to share this with you cohort. Let’s add styling for our logo and nav-list. Since the image in our header has a class of logo, we can add a selector for that, by adding a .logo to our css.
.logo {
  height: 50px;
}
Now let’s add the rest, what is the class of nav-list?
.nav-list {
  list-style-type: none;
  display: flex;
  gap: 20px;
}

li a {
  text-decoration: none;
  color: #000000;
  font-weight: bold;
}
The line li a is a CSS descendant selector. It targets <a> elements that are descendants of <li> elements. This means it will apply the specified styles to all anchor (<a>) tags that are inside list item (<li>) tags.
Step 3: Styling the Hero Section
Let’s add some of the styling for our hero section:
.hero {
  text-align: center;
  padding: 50px 20px;
  background: #048eaa;
  background-size: cover;
  color: #ffffff;
}

.hero h1 {
  font-size: 2.5em;
}

.hero img {
  border-radius: 50%;
  margin: 20px 0;
}

.hero form {
  display: flex;
  flex-direction: column;
  align-items: center;
  gap: 10px;
}

.hero button {
  padding: 10px 20px;
  background-color: #75e2e6;
  border: none;
  cursor: pointer;
}
Now we have this section ready, as you noticed I’ve added background color blue to this section, but the comp is asking for a background image. See if you can google how to add a background image to a section in CSS.
Step 4: Styling the Info Section
Time to look into the next section, where we have our 3 dogs with a title and description for each one.
It looks like we have a section with class name "info", and inside of it we have 3 div elements with a class called "dog-info".
Cool!!! Let’s use the class selector to add some styling to our css.
.info {
  display: flex;
  justify-content: space-evenly;
  padding: 50px 20px;
  background-color: #f0f0f0;
}

.dog-info {
  text-align: center;
}

.dog-info img {
  border-radius: 50%;
  width: 150px;
  height: 150px;
}

.dog-info h2 {
  font-size: 1.5em;
  margin: 10px 0;
}

.dog-info p {
  font-size: 1em;
  margin: 10px 0;
}

.dog-info button {
  padding: 10px 20px;
  background-color: #048eaa;
  color: #ffffff;
  border: none;
  cursor: pointer;
}
- It looks like we have some border color around images, where should we add them in our css file? Which selector should we use to add that border color?
Step 5 : Styling the Footer
On your own: Your task is to add the footer section content and styling. How would you add the 3 social media icons in the footer section? You can find these icons in the asset folder. How would you add styling for them in your CSS file?
Don’t worry if you cannot match it exactly, just do your best. Consider what you’ve learned already. You may want to make use of div, section, and image tags.
Phase Three: Adding behavior JavaScript
We want users of our application to actually be able to type a name into the name field and when they click the “Name This Dog” button, we want the site’s <h1> header to now display the dog’s name instead of the text “Some Dogs”.
Step 1: In the main.js file
Inside of your main.js is where we are going to add our JavaScript code. First, we need to link this file to our index.html file. Add a <script> tag to link the main.js file at the end of the body tag, under the closing </footer> tag.
<!-- ... existing code ... -->
    </footer>
    <script src="main.js"></script>
  </body>
</html>
Step 2: Add JavaScript for DOM manipulation
Now, let’s add the JavaScript code to handle the form submission and update the dog name in the hero section. Here is the steps that we need to take when we want to update the dog name in the hero section.
- First, select the
<form>element from the DOM. - Next, add an event listener to that form.
- After that, get the value of the
<input>field. - Lastly, update the text of the
<h1>tag to be the value the user entered in the input field.
Ok first thing first, in our main.js file, let’s select the elements we’ll need by using document.querySelector.
var form = document.querySelector(".hero form"); // document here is referring to the DOM (Document Object Model), .hero is the class name of the form, and form is the tag name of the form.  This tell JS to go find a form element that inside an element with the class name .hero
var input = document.querySelector("#dog-name"); // #dog-name is referring to the ID of the input field.
var headerText = document.querySelector(".hero h1 strong"); // .hero is the class name of the h1 tag, and strong is the tag name of the strong tag. So here we are referring to the strong tag inside the h1 tag which is inside the hero section.
JavaScripts console.log is similar to puts in Ruby. Take a moment to console.log the form, input, and headerText variables. Open your Chrome DevTools console tab (Command (⌘) + Option (⌥) + i) to see the output.
console.log
console.log("Hello, World!"); // Hello, World!
Step 3: Add an event listener to the form
Let’s add our event listener to the form. We can use the addEventListener method.
This method accepts 2 parameters:
- the type of the event we’re “listening” for, in this case
"submit". - a callback function outlining the code we want to run when that “submit” event happens to the form.
form.addEventListener("submit", function (event) {
  event.preventDefault(); // Prevents the default behavior of the form which is refresh the page on form submission.
  var dogName = input.value;
  headerText.innerText = dogName;
});
Wow! What just happened? Let’s break it down together.
- By adding an event listener to our form, we’re saying “hey pay attention to this form and if a “submit” event happens to it, run all this code”
- The default behavior of a form is to reload the page on form submission (i.e. when the submit button is clicked), but we don’t actually want that to happen. So we use the event.preventDefault method to prevent the page from reloading.
- The variable
dogNameis capturing and storing whatever the user has typed into the input field by accessing the input’svalueproperty. - On the next line, we are using the
.innerTextproperty of theheaderTextelement and reassigning it’s value to be the value the user entered into the input field.
Step 4: Refactoring our JavaScript
We should refactor our JavaScript code to clean it up a bit. Rather than putting all the code we want executed directly inside the eventListener, we could pull that code out into its own well-named function, then simply reference that function in the event listener. This refactoring will keep our logic neatly placed in a function and let our eventListener be simple and logic-free.
Write a function called displayDogName and move the logic from the eventListener into that function. Then, for the second argument of your event listener, replace the anonymous function and all its code with that named function.
form.addEventListener("submit", displayDogName);

function displayDogName(event) {
  event.preventDefault(); // Prevents the default behavior of the form which is refresh the page on form submission.
  var dogName = input.value;
  headerText.innerText = dogName;
}
Using JavaScript, we can select any element on the DOM and manipulated as we wish. Pretty cool, right??