JS fundamentals
Learning Goals
In this lesson we’ll cover:
- JavaScript data types and variables
- Operators, concatenation and interpolation
- JavaScript functions with or without arguments and parameters
- Conditionals and when to use them
- for loops and iteration with JavaScript
History of JavaScript
Way back in the early days of the web, Brendan Eich created JavaScript. Legend has it that he wrote it in 10 days in 1995 while he was working as an engineer at Netscape. The language was first released with Netscape 2 in 1996. The name ‘JavaScript’ was an oh-so-clever marketing push to try to pick up on the momentum of Sun Microsystems’ popular language Java, but instead it led to years of confusion about the names of these two mostly unrelated programming languages.
What is JavaScript and Why?
JavaScript was created to make the web more dynamic. It is an object-oriented scripting language that can also be written functionally and is made to run inside a host environment like a web browser and provide programmatic control over the objects of that environment. For example, when you click a button and you want something about the webpage to change, you will use JavaScript.
JavaScript can be client-side and server-side, meaning that it can be used to control user-facing interfaces as well as handle the server-side extensions that connect with a database.
It’s a highly versatile and flexible language, and has become the most commonly used language of the web.
Now that we know a little bit about JavaScript, let’s talk about how to actually use it!
Note: ES6 is the most current version of the ECMA Script Spec. We will be using the ES6 syntax.
Variables & Data Types
Variables
In any programming language, variables are what we use to store data values so that we can access and reuse those values throughout our code. The name “variables” drives home the point that the stored data can change (or vary) along the way. Variables can start off holding one value and later be reassigned to hold a different value.
In Ruby, you declare a variable simply by assigning a value to it (person_age = 21, country_name = "Spain").
In JavaScript, you must declare the variable using a keyword of either var, let, or const.
Go to the js_fundamentals file of your Mod 2 Sandbox repo. Check out the JS syntax in the code there. Run it, break it, get weird with it.
JS Syntax Examples
var firstName = 'Ben';
var age = 26;
const isNice = true;

const policeSketchDescription = {
  hair: 'blond',
  eyes: 'brown',
  isTall: false,
  visibleTattoos: 1
}

let favoriteFoods = ['pizza', 'blueberries', 'ice cream', 'sushi']

let partnerName = null;
let jobTitle;
Data Types
We can see each of the 7 data types we’ll be working with in JavaScript in the syntax examples above. Let’s identify each as we go through them.
JS Basic (primitive) Data Types - BUNNS:
- Boolean
- a
trueorfalsevalue (not in quotation marks)
- a
- Undefined
- the absence of a declared/defined value
- maybe we declared a variable name but didn’t assign a value yet
- Null
- an intentionally declared value of “nothing”
- maybe a placeholder value until data comes through to replace it
- Number
- any number - a negative, decimal or whole number (not in quotation marks)
- String
- text data - any characters wrapped in quotation marks (including letters, numbers, symbols, spaces)
- in JS you can use ‘single quotes’ or “double quotes”
JS Complex Data Types:
- Objects
- like hashes in Ruby - groupings of related data in key-value pairs
- Arrays
- like, well, arrays in Ruby
Rules for Naming Variables
- Variables must begin with a letter, dollar sign, or an underscore. They cannot begin with a number.
- Variables can contain any of the above characters plus a number, but you cannot use a dash (-) or a period (.) within the name.
- You cannot use any JS keywords or reserved words (such as
varorfor) as a variable name. - Variables are case sensitive.
dogis different thanDog - Use names that describe the kind of information you plan to assign the variable.
- If your variable is made up of more than one word, then use camelCase. Capitalize every word AFTER the first word, which is lower case:
thisIsMyVariableName.
Accessing Data Within an Object - JS
JS vs Ruby - Key Differences
- In Ruby, you use bracket notation to access data within a hash.
- In JS, you can bracket notation. But you can also use dot notation.
Using the policeSketchDescription object above, I can access the hair property’s value two different ways:
policeSketchDescription.hair
policeSketchDescription["hair"]
Your Turn (in your js fundamentals file)
- Use console.log and dot notation to print the value “brown” from the policeSketchDescription object
- Use console.log and dot notation to print # of visible tattoos from the policeSketchDescription object
- Use console.log and bracket notation to print first element in the favoriteFoods array - ‘pizza’
- Use console.log and bracket notation to print last element in the favoriteFoods array - ‘sushi’
Dot or Bracket?
Dot notation is simple and clean. We use it when we are typing the exact property we want to access.
A common use case for using bracket notation to access data with a JS object is when the data point you care about is being passed into a function as an argument. You would then use the function’s parameter within the bracket notation to access whichever data point is passed. This makes it dynamic, it can access a different value each time depending what is passed as the argument.
function getData(datapoint) {
  return policeSketchDescription[datapoint]
}

console.log( getData('hair') )
  // passing 'hair' as the arg means the bracket notation will be pulling the 'hair' value from the object


console.log( getData('isTall') )
  // passing 'isTall' as the arg means the bracket notation will be pulling the 'isTall' value from the object
Using Variables Together
Your Turn (in your js fundamentals file)
- Declare 2 variables, one named “quantity” and one named “mythicalCreature”.
- Declare a variable named “creatureCount” but don’t assign it a value quite yet. If you console log it, it should give you “undefined”
Let’s make the value to our “creatureCount” variable be our “quantity” + our “mythicalCreature”.
let quantity = 3;
let mythicalCreature = " unicorns";
let creatureCount = quantity + mythicalCreature;
In your file, console log your “creatureCount” variable. What do you get?
Concatenating Variable Values
In the example above, we used the + string operator to combine the values of two different variables. This is called concatenation. Concatenation is using the + string operator to essentially smash values together to form a bigger longer string.
We can concatenate html tags, text, numbers, and variable values. Let’s revisit our example above to concatenate a more readable phrase as the value of our creatureCount variable:
let quantity = 3;
let mythicalCreature = " unicorns";
let creatureCount = "<p>I have " + quantity + " very fancy" + mythicalCreature + "</p>"
This is very useful when we want to append data to our webpage, because it means we can write out an entire HTML tag and concatenate the data from our variable.
Interpolating Variable Values
Another syntax option for accomplishing the same goal is called interpolation. Interpolation lets us smash values together to form a bigger longer string using backticks. We can plug in variable values using ${}.
let quantity = 3;
let mythicalCreature = "unicorns"; //notice no extra space in the "unicorns" string
let creatureCount = `<p>I have ${quantity} very fancy ${mythicalCreature}</p>`
Key Points So Far
That was a lot of information. Here’s a recap of the most important things we need to know.
What are JavaScript’s primitive data types? Complex data types?
Primitive: BUNNS! boolean, undefined, null, number, string
Complex: objects and arrays
Technically also:
- Symbol (new in ECMAScript 6)
- BigInt (new in ECMAScript 2020)
You won’t likely need either of these in your time at Turing so we won’t dig into them.
What do we need to know about each data type?
-
Boolean: true or false (not in quotation marks)
-
Undefined: not yet given a value (the value hasn’t been defined so its UNdefined)
-
Null: intentional absence of a value
-
Number: regular ol’ numbers as we know them
-
String: any characters wrapped in quotation marks (single or double quotes) - often just normal text/words
-
Object: like a hash in Ruby - access data using bracket or dot notation
-
Array: like an array in Ruby - access data using bracket notation
What are the differences and use cases for undefined vs null?
Both mean “nothing”.
Null is like a placeholder where someone proactively decided to specifically declare “nothing”.
Undefined is kind of unintentional. Like, it’s nothing because no one got around to declaring anything so it defaults to “nothing”.
A use case for null might be creating a userEmail variable and assigning it to null in case the user does not provide an email.
You aren’t likely to specifically assign a value of undefined so there’s not a great use case to use as an example.
Why do we need variables?
To be able to store pieces of data in a way that we can reference and use them later.
What are best practices for naming variables in JS?
- Variable names cannot begin with a number. They can begin with a letter, dollar sign, or an underscore.
- You cannot use a dash (-) or a period (.) within a variable name
- You cannot use keywords or reserved words (such as var or for)
- Variables are case sensitive.
- Choose names that describe the kind of information you plan to assign the variable. Call it what it is.
- Use camelCase for multiple word names i.e., thisIsMyVariableName
What is the difference between concatenation and interpolation?
Concatenation and interpolation are two different ways to accomplish the same goal. The only different is the syntax - neither is better than the other.
Concatenation:
- Uses the
+string operator to combine variables and other values (strings, numbers, html tags) to make a big, long string.
var name = "Hillary";
var age = 30;
var location = "Denver";

var concatenatedString = "My friend " + name + "is " + age + "years old and lives in " + location + "."
Interpolation:
- Uses the backticks and
${ }to inject variables to make a big, long string.
var name = "Hillary";
var age = 30;
var location = "Denver";

var interpolatedString = `My friend ${name} is ${age} years old and lives in ${location}.`
What is type coercion?
We didn’t cover this yet today but you may have seen it in your JS party in Mod 1. Sometimes JavaScript tries to help us by deciding to change a data type to accomplish a goal without us explicitly telling it to do so. A common example is coercing a number into a string.
For example:
var num = 30;
var word = "Rock";
var showName = num + word;

//showName will be a string of "30Rock" because JavaScript coerced the number 30 into a string to accomplish the goal of combining the two differing data types.
var vs let vs const?
var, let, and const are all keywords for declaring variables. Modern JavaScript uses ES6’s let and const but the ES5’s var is alive and well and used in production code to this day. Throughout Turing, you’ll see and work with all 3.
We’re not covering it today but eventually, you’ll want do your research on their differences.. They each behave a little differently in terms of scope and reassignment, so it’s important to understand the differences. If you don’t, you might run into some errors.
Operators
Expressions rely on operators to calculate their single value. There are 5 basic types of operators to get you started:
- Assignment operators assign a value to a variable. (hint: you’ve got these down already)
var color = 'magenta'; - Arithmetic operators perform basic math.
var addTwo = 2 + 2; - String operators combine strings.
var greeting = 'Hello! ' + 'Nice to meet you.'; - Comparison operators compare two values and return a true or false.
var buy = 3 > 5; // Value of buy is false - Logical operators combine expressions and return a Boolean value of true or false.
var buy = (5 > 3) && (2 < 4);
Functions
Just like methods in Ruby, in JS functions are reusable blocks of code that group statements together to perform a specific task. To create a function, you must give it a name and then write the statements required for the function to achieve its task inside the function’s curly braces. Let’s work through the pieces and parts of a function.
Anatomy of a Function:
// ES 5 syntax for declaring a function
function logStatement() {
  let myStatement = "Assigning a string to a variable called 'myStatement'";
  console.log(myStatement);
}

// ES6 syntax for declaring a function (arrow function)
// const logStatement = () => {
//   let myStatement = "Assigning a string to a variable called 'myStatement'";
//   console.log(myStatement);
// }
- You declare a function using the keyword
function. - You name the function based on what it does using a present-tense action verb. Then include a set of parentheses after the name, which can be empty or accept parameters.
- After the parenthesis you open a set of curly braces, which act as bookends to hold the set of statements you want the function to run when it is called.
JS vs Ruby - Invoking functions
Remember - calling, or “invoking” a function in JS is different than how you’ve called methods in Ruby. In JavaScript you must put parenthesis after the function name to invoke it. Any arguments you’re passing to the function will go inside those parenthesis.
Call a Function:
// Calling a function without arguments
logStatement();

// Calling a function with arguments.  You can only pass arguments if you've created parameters to accept those values in the function declaration.
logStatement("arg1", "arg2");
When this code is read, logStatement() is “called”, and all three statements within the function’s body (those curly braces) get run.
In JS, seeing () after the function name is how you know it is a function being invoked.
Let’s go ahead and declare logStatement() in the console together and then call it. What do you notice about the code as it is being run? What do you notice about the code being run if you swap the 2nd and 3rd statements?
Pass Information to a Function:
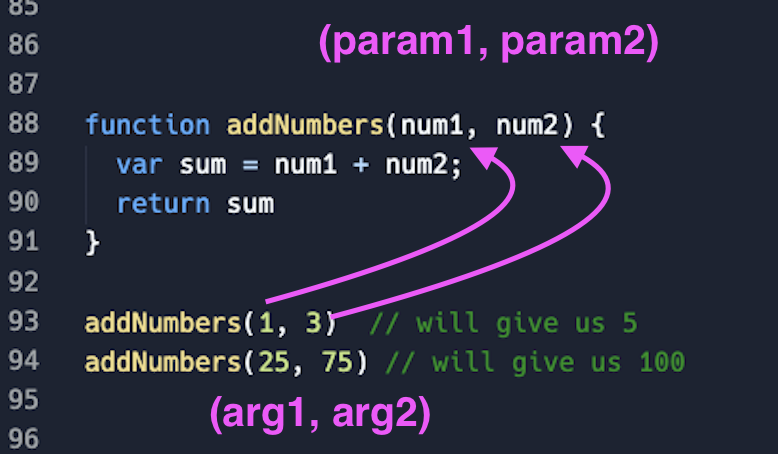
Functions often need data to do their job. We pass data into function with parameters and arguments. You declare your parameters inside the () parenthesis of the function declaration. Parameters act like variables INSIDE the function. They get their values when you pass arguments in the function invocation and you can use the parameters within the function just like you would use variables.
Parameters vs. Arguments
There’s a subtle difference. Parameters are the placeholders declared in the function declaration (similar to declaring a variable). Arguments are the assigned values you provide for each parameter/placeholder each time you invoke the function.
// parameters named on declaration of function
function myDreamCar(make, model) {
  return "Buy me " + make + " " + model;
}

// arguments "Audi" and "R8" passed into the invocation of the function
myDreamCar("Audi", "R8");
Your turn
Declare and invoke your own functions in your Mod 2 sandbox:
- Write a function called “greetPerson” that takes in 2 arguments: a
firstNameand alastName. Then prints a greeting message that incorporates the full name. - Write an “addNumbers” function that takes in 4 different numbers as 4 different arguments, add them all up, and prints the total.
- Write an “applyDiscount” function that takes in 2 arguments: a price and a discountAmount. Then prints the new sale price by subtracting the discount amount from the price.
Getting A Value from Functions
Sometimes we have functions that need to do some sort of calculation or data manipulation, then give us back the result so that we can use that value elsewhere in our code. Often, we will take that returned value and use it elsewhere in our application - for example: to update what is being displayed to our user.
For example:
- A user enters their birthday.
- We have a function that takes in that birthdate and uses it to calculate their age.
- Our function will then return their age value.
- We use that returned age value in our code that displays user info on the webpage.
You will often be invoking functions within other functions and using their return values elsewhere as you build your code. Some functions return something, other functions just do something.
To get a value back from a function, you have to use the return keyword.
Let’s practice in our file:
function addTwoNumbers(num1, num2) {
  console.log('Boom');
  return num1 + num2;
}

var result = addTwoNumbers(4, 7)
We are capturing the value being returned from the function invocation in our “result” variable. If we console.log the “result” variable, we should see 11 printed to the console after “Boom” is printed.
What happens if we move the console log statement to come after the return statement?
The return statement ends the execution of the function and provides the value to be returned to the function caller. Any lines of code that come after the return statement in a function will not run.
If there is no return statement in a function, “undefined” is returned by default. Remember, some functions need to return a value, others just do stuff without needing to return any value. In that case, they would by default return “undefined.
The following return statements all break the function execution:
return;
return true;
return false;
return x;
return x + y / 3;
Your turn
Refactor the 3 functions you wrote previously - greetPerson(), addNumbers() & applyDiscount() so that in addition to printing the value, they also return that value.
- Invoke each function and save the result in a varable.
- Console log that variable to ensure the correct value is being returned out of the function.
Declare a new “incrementByOne” function that takes in a number as an argument, then returns that number incremented by one.
- For example,
incrementByOne(11)–> should return 12 - To check your work you can either:
- Save the invocation of your function to a variable, then console log that variable.
- Or, invoke your function within a console log so that the return value is printed.
Conditionals
Sometimes we want to perform an action based on some kind of condition. In English, we can say “If this thing is true, then do that.” Let’s look at the basic structure of a conditional in JavaScript:
if (expression) {
  statement;
} else {
  statement;
}
If the expression evaluates to true, then the statement(s) for that condition will run. Otherwise, if the expression is false, then the statement(s) will not run at all. The expression will usually contain an operator to make a comparison (that evaluates to true or false).
Some examples of expressions we could use for a conditional are:
myNum < 5userCity === "Denver"isTired === true
Now for some real conditional examples.
function identifyCookie(cookie) {
  if (cookie === "chocolate chip") {
    console.log("This cookie is a chocolate chip cookie!");
  } else if (cookie === "oatmeal raisin") {
    console.log("This should not even be called a cookie :(");
  } else {
    console.log("I bet you wish you had a chocolate chip cookie");
  }
}

identifyCookie("chocolate chip")
identifyCookie("oatmeal raisin")
identifyCookie("sugar")
Your Turn
Exercise 1
In your file, copy/paste the function skeleton and invocations below.
- Build the “guts” of the function so that it looks at the hoursOfSleep parameter and responds based on the value that is passed as an argument on the invocation.
- Your function should log “I am groggy.” for less than 6 hours of sleep.
- Your function should log “I feel fantastic!” for 6 or more hours of sleep.
function evaluateSleep(hoursOfSleep) {
  //Add your code here
}

evaluateSleep(8)
evaluateSleep(4)
Exercise 2
Imagine you’re a developer for AAA. Your website needs to provide different information to users based on their age.
In your file, create a function called “checkAge” that takes in an age as an argument.
- The function should print a different message depending on the age passed in.
- If the user’s age is under 18, reply with “Unfortunately, you do not meet our age requirements.”
- If the user’s age is between 18 - 64, reply with “Welcome to AAA!”
- If the user’s age is 65 or older, reply with “Welcome to AAA! You’re eligible for our senior discount!”
for loops
All programming languages have ways to loop (or iterate) through data. JS is no exception.
Copy/paste this JavaScript for loop into your file and run it to see how the value of “i” changes on each “loop”
for (let i = 0; i < 10; i++) {
  console.log(i);
}
If we break this down, we see that our loop is constructed from the following parts:
- the keyword
for - a set of rules, or conditions (var i = 0; i < 10; i++ )
let i = 0is the initialization. Creating a variable “i” and starting it at a value of 0.i < 10is the condition. Stating “keep looping as long as the current value ofiis less than 10”.i++is the increment. Adding 1 to the value ofiafter each loop.
- opening and closing curly braces that contain the code statements we want executed on each loop. In this case:
console.log(i);
We can use for loops to execute some code a certain number of times, like we’re doing above. More commonly, we can use for loops with arrays to access each element in the array one at a time using i and bracket notation, and then do something to that element or with that element.
Copy/paste the following examples into your file and run the code.
//Example 1
let fruits = ['apples', 'oranges', 'bananas'];

function bragYourFruits() {
  for (let i = 0; i < fruits.length; i++) {
    console.log("I have some " + fruits[i]);
  }
}

bragYourFruits()
//Example 2
let kids = ['chris', 'heather', 'erica', 'rachel', 'becca'];

function shoutForChildren() {
  for (let i = 0; i < kids.length; i++) {
    console.log(kids[i].toUpperCase());
  }
}

shoutForChildren()
Your turn
Copy/paste the code below into your file. Finish building the “guts” of the calculateTotalPoint function based on the commented out directions.
// Practice 1
let points = [7, 3, 0, 14];

function calculateTotalPoints() {
  // add code here to loop over the points array, adding up all the numbers as you go until you get the total sum
  // return the total sum as the return value of the function
  // Hint!  You'll probably need a variable to keep track of the running sum total as you add it all up


}

console.log(calculateTotalPoints()) //this invocation is inside a console log so we can see the return value printed to the console
Solution
let points = [7, 3, 0, 14];

function calculateTotalPoints() {
  let counter = 0
  for (let i = 0; i < points.length; i++) {
    counter += points[i]
  }
  return counter
}

console.log(calculateTotalPoints())

// Our function should return 24
Now let’s actually use the return value elsewhere in some code.
Copy/paste the code below after your completed calculateTotalPoints function. Run it!
function printTotalPoints() {
  return `Your team scored ${calculateTotalPoints()} points!`;
}

console.log(printTotalPoints());
// expected output: "Your team scored 24 points!"
for loops are not the only way to loop over an array. Next week you’ll learn about build-in array prototype iterator methods like:
.forEach(), .map(), .sort(), .filter(), .reduce()
These were all written into the JavaScript language “under the hood” with a for loop!
More Key Points
That was a lot of information. Let’s go over the most important things we need to know.
Various operators allow us to store data, do logic, math, comparisons and more
Common examples:
= Assign and reassign values.
+ Add numbers or concatenate strings.
=== Strictly equals (checks for an exact match)
+= Add and reassign.
var counter = 0;
counter += 1  //adds one to the previous value of counter and saves it as counter's new value
Statements and Expressions
Statements are our lines of code that get executed one by one and do something.
console.log('hello world')
Expressions are parts of our code that get evaluated down to a single value.
(user.location === 'Denver') < an expression that evaluates to true or false
We use parameters and arguments to pass values (data) to functions
- We declare the parameters in the function declaration.
- We pass new values to the parameters each time we call the function by passing arguments in the invocation.
- Usually we want to pass an argument for every parameter. 2 parameters? Pass 2 arguments.
- Arguments provide values to the parameters in order. First arg becomes the value of the first param. 2nd arg > 2nd param. Etc
The “return” keyword lets us get a value from a function when we invoke it.
- Only one value can be returned from a function on any given invocation.
- Once JS runs the
returnstatement, the function execution stops and no more code is executed. - If no return value is specified in a function, it returns “undefined” by default.
for loops let us repeat a block of code a certain number of times, often the length of a specific array
- In a
forloop we can useiin bracket notation[i]to access each element in an array, loop by loop
Debugging in Javascript
In Ruby, debugging often involves using tools like pry to insert breakpoints and inspect the state of the program. Ruby’s interactive console allows you to pause execution and explore variables, methods, and the call stack. In JavaScript, especially on the client-side, debugging is done within the browser’s developer tools. You can use the console.log() method to print values to the console, or the debugger statement to pause execution and inspect the state of the program. Modern browsers provide a rich set of tools for stepping through code, setting breakpoints, and examining the call stack and variables.
Because client-side JS is run entirely in the browser, the technique for troubleshooting broken code is more complicated than debugging in Visual Studio. Luckily, modern browsers provide a collection of options for digging into your code.
1. Developer Tools
One of the first things you should familiarize yourself with when working with JavaScript (or HTML… or CSS…) are the dev tools. You can find a cool tutorial to dive deeper with Code School’s Discover-DevTools Tutorial. (Chapters 3 & 4 are particularly helpful)
To open developer tools in Chrome:
- on Mac:
command+option+i - (or) Right click on the browser window and select
inspect - (or) Select
Viewin the navbar, thenDeveloper, thenDeveloper Tools.
When working with JavaScript, it is useful to keep your console open at all times to watch for errors and anything you’ve told your code to print out. Bringing us to…
2. console.log()
console.log() prints whatever is provided as an argument to the console.
Given the following function called printStuff(), adding console.log() will print the value of myVariable to the console.
const printStuff = function(){
  var myVariable = 5 + 5
  console.log(myVariable);
}

printStuff()
=> 10
If you’re confused about what a variable or function is returning, throw console.log() into your code or directly into the dev console in your browser to confirm/deny suspicions.
3. Debugging In the Console
You can stick debugger; within a function to pause the browser from running the script when it hits a particular part of your code.
// index.js
let var1 = 5
let var2 = "Ilana"
const myMath = (var1, var2) => {
  var1 * var2
  debugger;
}
Warning: A debugger statement will not trigger unless your inspector tools in the browser are open. This is meant to not interrupt a users experience if a developer accidentally commits and deploys a debugger statement.
In the browser, if we open up the dev tools, navigate to the console and try to search for something. The program will freeze on the line debugger. This lets us type stuff into our console to see what’s going on. It also lets us take the reins and step through the code piece by piece from that point forward to get greater visibility. The console is similar to a pry session in this context.
For a more in-depth lesson on working with DevTools - check out advanced debugging or the Chrome Documentation.