React: Task Manager Tutorial
Learning Goals
- Create functional components
- Use state and props to manage application data
- Use Hooks with functional components
- Use the fetch API to make API requests
- Create a controlled form
- Use JSX
Before you get started…
This tutorial was repurposed from another tutorial called IdeaBox, therefore, names have been updated for Task Manager. Provided images are there as reference.
You will complete this lesson on your own. Read each section carefully and completely. Moving quickly through this lesson is not the goal. You should move through the lesson at a pace that allows you to take solid notes and fully understand the code you are writing. We will provide lots of code blocks for you. Resist the temptation to copy and paste the code from those examples. Doing this will only hurt you in the end, as you’ll be missing out on a lot, a lot, a lot of learning.
As you are working through it, please write down any questions that pop up for you. If a blocker pops up, post your question in your codehelp slack channel. Work with your classmates to try to figure it out.
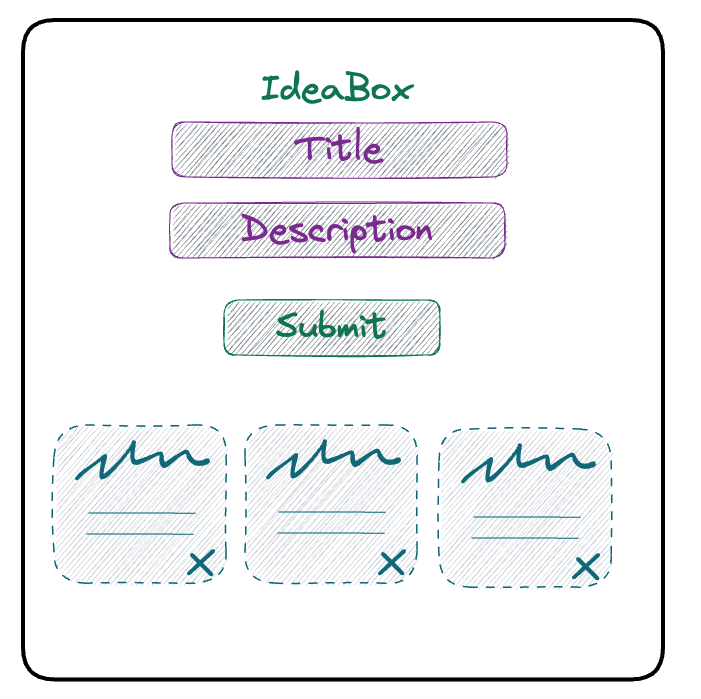
What You’re Building
Here is a peak at what you’re going to build during this lesson:
Stop and Think
How would you build this application using vanilla JS? What functions would need to exist?
React Developer Tools
React has its own set of developer tools that are extremely helpful. Install the dev tools Chrome extension. Now, anytime you’re looking at a React app, you’ll see a “Components” and “Profiler” tab in your dev tools! As you’re working through this tutorial, pay attention to those tabs (especially the “Components” tab).
Creating a new React app with Vite
For this lesson, we will be using Vite to spin up a React application.
❌ create-react-app used to be a good option but is no longer maintained.
Many of the dependencies and configuration files will be obscured, since we won’t need to worry about them. This is a fast way to set up a React application so we can concentrate on building out the app, instead of spending our time and energy on tooling.
Note: Hand-rolling a React application will make you more familiar with how React works but isn’t something you need to understand right now. (A good personal project is to learn how to configure React.)
Get started with Vite
Prerequisites:
Vite requires Node.js version 18+ or 20+. Let’s use nvm (node version manager) to install the latest version of Node.js.
Run:
nvm install 22
You can confirm you have Node version 22 by running node -v.
If you have trouble with the nvm command, ensure you have nvm installed by running nvm -v.
To set up a new react application, run the command:
$ npm create vite@latest task-manager --template react
You will see something like this run in your terminal:
Select y to proceed then select React and JavaScript
Need to install the following packages:
  create-vite@latest
Ok to proceed? (y) y

> npx
> create-vite task-manager react

│
◇  Select a framework:
│  React
│
◇  Select a variant:
│  JavaScript
│
◇  Scaffolding project in /Users/abdulredd/Desktop/turing/2mod/my_stuff/projects/task-manager...
│
└  Done. Now run:

  cd task-manager
  npm install
  npm run dev
As the instructions say, let’s change directories cd into our new task-manager application and install dependencies by running npm install.
Open the repo in VS Code with code .
Finally run npm run dev to see our new boilerplate application displayed at http://localhost:5173/
Explore
Take a few minutes and look around the boilerplate. Hint: start at the src/ folder!
What happens if you:
- Change some of the HTML you see in the
App.jsxfile? - Change some of the CSS you see in the
App.cssfile?
You’ll also notice an main.jsx file. What is going on in there?
This is a great time to do some googling or ask chatGPT for help understanding.
// main.jsx

createRoot(document.getElementById("root")).render(
  <StrictMode>
    <App />
  </StrictMode>
);
Modular File Structure
React lets us keep our code modular, but what does it look like to have our code and project files be modular?
One small example is to keep a modular file structure. Any and all files related to a particular component live in the same directory! We recommend setting up your file structure like the example below each time you build a new project.
Take a moment now to create a components directory within your src directory. Create a directory for App within that components directory. Move the 2 App files into the App directory. Create a directory for Form, Tasks and Card - we’ll add files to them later.
src 📁
├─ components 📁
│  ├─ App 📁
│  │  ├─ App.jsx
│  │  └─ App.css
│  ├─ Card 📁
│  ├─ Form 📁
│  └─ Tasks 📁
Uh-oh! Changing the file structure will impact our imports. VS Code will offer to update App imports. But we’ll still need to update the reactLogo import in App.jsx. That import would now be import reactLogo from '../../assets/react.svg'
Task Manager
Let’s get rid of all the boilerplate inside the App.jsx file. Yep. Just ERASE THAT CODE - including the imports!
You’ll notice that as soon as we save our changes, the browser re-renders. Look into the terminal, and you’ll see another build kick off. This is because Vite gives us hot-reloading. Any time we make a change, the browser will update to show our changes. However, sometimes if we hit a significant error, we may still have to refresh the page or re-run npm run dev to get things going again after implementing the fix. You may need to refresh your browser after deleting the code in App in order to see the error outlined below.
Look at the console in our dev tools now that we’ve deleted our App.jsx code, and you’ll see an error that reads:
“Uncaught SyntaxError: The requested module ‘/src/components/App/App.jsx?t=1739225023971’ does not provide an export named ‘default’ (at main.jsx:4:8)”
Back in our main.jsx file we’re trying to render a React component: App. However, we’re no longer exporting a valid React component!
While JavaScript error messages aren’t always very clear or helpful, React error messages are much better at telling us what’s going on. The often even include a link to the appropriate part of the React docs!
Let’s start building out our App component.
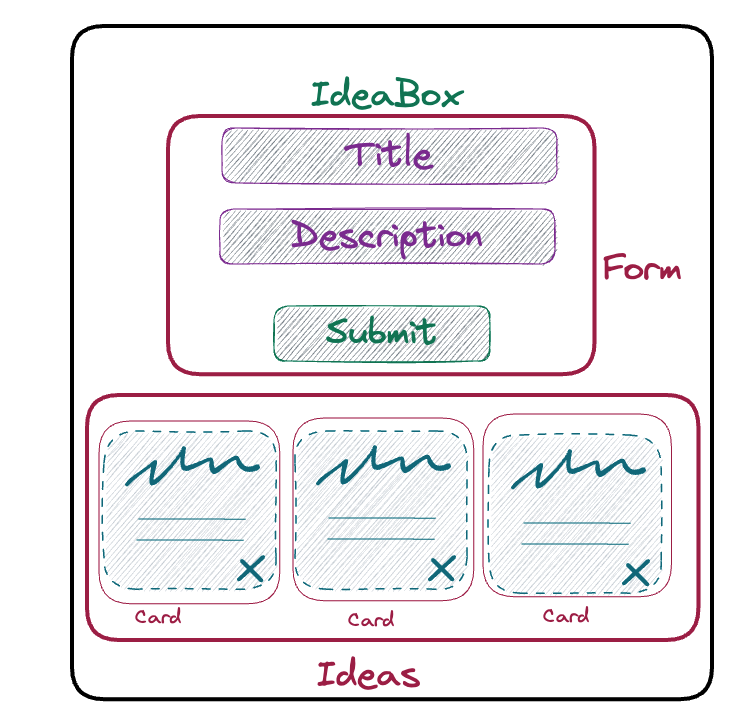
Planning our app
Let’s figure out what should be a component in our app.
-
We have an App component. That should probably hold onto our list of tasks.
-
We need a Form component so we can create new tasks. The Form component will have to be able to add new task to App’s list of tasks.
-
We need a Card component to display our tasks.
-
We can create an Tasks component to hold all of our Cards.
App.jsx
Because we want App to hold onto our list of tasks, let’s think about how we’re going to store that information.
We will use state to store data, like our list of tasks. You learned about state in Mod 1 when used to store information about a class. It is a very similar concept here. It might be helpful to recall some of those notes. ChatGPT and google are also great options to understand state, but you should really make the official React Documentation your first stop.
In order to use component state, we need to import useState hook from React. So, let’s import useState hook from React, and create our App component!
// App.jsx

import { useState } from 'react';

function App() {
  // Logic and other needed functions will go here

  return (
    //Your JSX code goes here
  )
}

export default App;
The above code is defining the App functional component in React. App returns JSX code via the return keyword just like any ol’ function.
It’s important to note that this code is using functional components, rather than class components and OOP. This allows us to manage our component in a more concise and streamlined way, without relying on class inheritance and traditional OOP principles.
Let’s keep writing our App component!
// App.jsx

import { useState } from "react";

function App() {
  return <h1>Task Manager</h1>;
}

export default App;
Save this code and go check your browser. What do you see?
Let’s take a minute and examine that return statement.
Understanding JSX
It looks like we are returning some HTML! Very easy to read, right?
What we’re actually writing here is known as JSX. It’s an abstraction that makes React easier to write!
JSX is “JavaScript and XML” - it’s a handy mashup language that allows us to write HTML with a bit of JavaScript injected in. You can read more on it here (and a bit more in depth here). It’s not something you need to be an expert on, but you should know that it’s being used in React. In the meantime, we’ll see how JSX makes our lives easier throughout this lesson!
Okay. Now try to add a paragraph tag after your <h1> tag. What happened?
// App.jsx

import { useState } from "react";

function App() {
  return (
    <h1>Task Manager</h1>
    <p>Hi!</p>
  );
}

export default App;
You should receive this error:
Failed to compile.

...src/components/App/App.jsx: Adjacent JSX elements must be wrapped in an enclosing tag. Did you want a JSX fragment <>...</>? (6:4)

  4 |     return(
  5 |       <h1>Task Manager</h1>
> 6 |       <p>Hi!</p>
    |       ^
  7 |     )
  8 |   }
Let’s figure out what this error is saying. “Adjacent JSX elements must be wrapped in an enclosing tag.”
If we think about this logically, it makes sense! Our component is just a function. And how many things can a function return at once? Just one! So in order to return multiple JSX elements, we have to wrap them in a single JSX element!
Since this is our App component, let’s wrap everything in a <main> tag!
NOTE
If you’re just looking for an unflavored container for your elements (aka they are not semantically related to one another, and the best element to use would be a <div>), then instead, use a <React.Fragment>! You can read more about Fragments here.
We’ll also import our App.css file. And give our <main> element a class of ‘App’ like so:
// App.jsx

import { useState } from "react";
import "./App.css";

function App() {
  return (
    <main className="App">
      <h1>Task Manager</h1>
      <p>Hi!</p>
    </main>
  );
}

export default App;
You’ll notice that instead of “class”, we’re using a “className” attribute on our <main> element. Why do you think this is?
App.jsx state
Okay. Let’s come back to our App component and create state - our “source of truth” for the data the app will be using.
// App.jsx

import { useState } from "react";
import "./App.css";

function App() {
  const [tasks, setTasks] = useState([]);

  return (
    <main className="App">
      <h1>Task Manager</h1>
      <p>Hi!</p>
    </main>
  );
}

export default App;
Reflect
- What is
useState? - What is the
setTasks?
For our application, we want to create a list (aka an array) of tasks.
Let’s start out with a couple of default tasks, just so we can have something to look at when we begin building out the rest of our components.
// App.jsx

import { useState } from "react";
import "./App.css";

function App() {
  const dummyTasks = [
    { id: 1, title: "Prank Travis", description: "Stick googly eyes on all his stuff" },
    {
      id: 2,
      title: "Make a secret password app",
      description: "So you and your rideshare driver can both know neither one of you is lying",
    },
    { id: 3, title: "Learn a martial art", description: "To exact vengeance upon my enemies" },
  ];
  const [tasks, setTasks] = useState(dummyTasks);

  return (
    <main className="App">
      <h1>Task Manager</h1>
      <p>Hi!</p>
    </main>
  );
}

export default App;
Open up your React Dev Tools (open your dev tools, then go to the Components tab). You can see that App now has state:
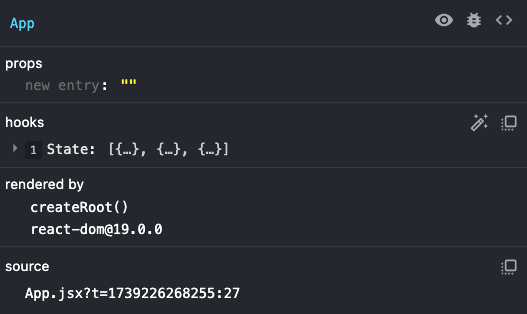
Neat!
Consider the following…
Okay. Let’s pause for a second. App.jsx is a functional component, and we used useState to setup a state for our component.
State
State holds data that represents the actual state of our application. State can be changed and mutated through user interactions.
React Hooks is a feature that was introduced at the end of 2018. It allows functional components to access and manipulate state. In future lessons, we’ll learn about other types of components as well. However, for now, it’s essential to understand functional components and how React Hooks enable them to manage state in a more concise and streamlined way.
Tasks.jsx
Next, let’s focus on getting our tasks to render!
We already said that we want to have a container for all of our task Cards. So let’s create that component! In your VS Code, within the src/components/Tasks directory, create two new files: Tasks.jsx and Tasks.css.
Note
You may have noticed that our App component was capitalized. And now our Tasks component file is capitalized, too. In React, component names should be written in PascalCase, which is a naming convention where the first letter of each word in the name is capitalized, and there are no underscores or hyphens between words. By following this naming convention, it becomes clear to other developers that a particular element in the codebase is a React component.
When an element starts with a lowercase letter, it refers to (and will be treated as) a built-in component like <div> or <span>, which can lead to silent errors or unexpected side-effects. It’s also important to note that capitalizing component names makes for good developer empathy, because they can look at the file tree and see at a glance which files are are components and which are not.
Will this Tasks component need to have state? What do you think?
Since the Tasks component will just be rendering Card components, it will not need to have its own state.
Let’s create a function called Tasks that returns an h2 that reads “Tasks go here!”
// Tasks.jsx

import "./Tasks.css";

function Tasks() {
  return <h2>Tasks go here!</h2>;
}

export default Tasks;
Then, back in our App.jsx, we can import our shiny new Tasks component and add it to our return so it will render!
// App.jsx

import { useState } from "react";
import "./App.css";
import Tasks from "../Tasks/Tasks";

function App() {
  const dummyTasks = [
    { id: 1, title: "Prank Travis", description: "Stick googly eyes on all his stuff" },
    {
      id: 2,
      title: "Make a secret password app",
      description: "So you and your rideshare driver can both know neither one of you is lying",
    },
    { id: 3, title: "Learn a martial art", description: "To exact vengeance upon my enemies" },
  ];
  const [tasks, setTasks] = useState(dummyTasks);

  return (
    <main className="App">
      <h1>Task Manager</h1>
      <p>Hi!</p>
      <Tasks />
    </main>
  );
}

export default App;
When we look at our browser, we should see our h2! That’s nice and all, but not very useful.
We have to pass our tasks array from the App component to our Tasks container component. We accomplish that by using props.
Props
Props (along with state) are the heart and soul, the meat and potatoes, of React. They are what allow us to pass information between components. Let’s take a look at how that might work.
We’ve mentioned that components are reusable pieces of code, that allow us to create unique instances of certain UI elements. We can do this by passing props to each of our components. Think about how you create a new function and pass arguments into it.
Props allow us to pass information from parent components to child components. We can pass strings, numbers, booleans, arrays, objects, functions, pretty much any piece of data we want access to in our child component. We can name them whatever we’d like, as long as we’re consistent and semantic with the names that we choose.
When we pass props down to a child component, it comes through as a simple JavaScript object with key value pairs.
Let’s start with an example, just to keep things simple. For now, since our Tasks component just contains an h2, let’s make that h2 say something different than “Tasks go here!”
In our App component’s return statement, let’s get rid of our <p> tag and pass some data as a prop when rendering our Tasks component.
// App.jsx

// ...
return (
  <main className="App">
    <h1>Task Manager</h1>
    <Tasks name="Travis" />
  </main>
);
// ....
Now, let’s adjust our Tasks component so it can receive and use that data coming in as props.
// Tasks.jsx

function Tasks(props) {
  return <h2>Hello, {props.name}!</h2>;
}
What are those curly brackets doing? In JSX, whenever we’re writing something that is JavaScript (aka “not HTML”), we have to wrap it in curly brackets. In this case, “name” acts like a variable. It’s not a string that reads “name” - it’s a placeholder that represents the value of the property (in this case, “Travis”)! Because it’s a variable, we have to surround it in curly brackets to tell the JSX to treat the contents like JavaScript.
In your browser, you should see “Hello, Travis!” In App.jsx, add another Tasks component to the App.jsx return() , but pass in a different name. What do you see in the browser? Try creating new props to use!
Okay, so just WHAT exactly is going on here?
props is the name of an object that contains key-value pairs. From our above example, the key is “name”, and the value is “Travis”. So, in our Tasks component, we can access the value by writing props.name (which gives us a string of “Travis”). This is the same dot notation we learned in Mods 1 and 2 to access data stored in objects.
If, in the return of our App component, we called the property “potato” instead of “name”, we would have to access it by (inside the Tasks component) writing props.potato. This is the same dot notation we learned in Mod 2 to access data stored in objects.
We can even destructure the props object, because it’s just a regular object!
// Tasks.jsx

function Tasks(props) {
  const { name } = props;

  return <h2>Hello, {name}!</h2>;
}
In this example, destructuring is a bit over-engineered, yes. However, we’ll see in our Card component that destructuring will save us from having to type props. over and over again.
And here’s YET ANOTHER super-fancy way to destructure:
// Tasks.jsx

function Tasks({ name }) {
  return <h2>Hello, {name}!</h2>;
}
We can destructure props ON THE WAY IN. Whoa! It’s accomplishing the same thing as destructuring on a separate line, like in the previous example. Be aware of destructuring but don’t stress it at this time.
State vs. Props
Understanding the difference between props and state can be tricky. Read through the top three answers on this stackoverflow question, and go through any links or resources provided in the answers. Just because one answer has the most upvotes, doesn’t mean it’s going to be the one that makes everything click for you. Take your time reading through the explanations here.
Mapping over the tasks array
All right. We don’t actually want to render an h2 in our Tasks component. We want to render some Cards with some gosh dang TASKS!
Let’s create a Card component to use.
In the Card directory we created earlier, create the Card.jsx and Card.css files.
// Card.jsx

import "./Card.css";

function Card() {
  return (
    <div className="card">
      <h3>Card!</h3>
    </div>
  );
}

export default Card;
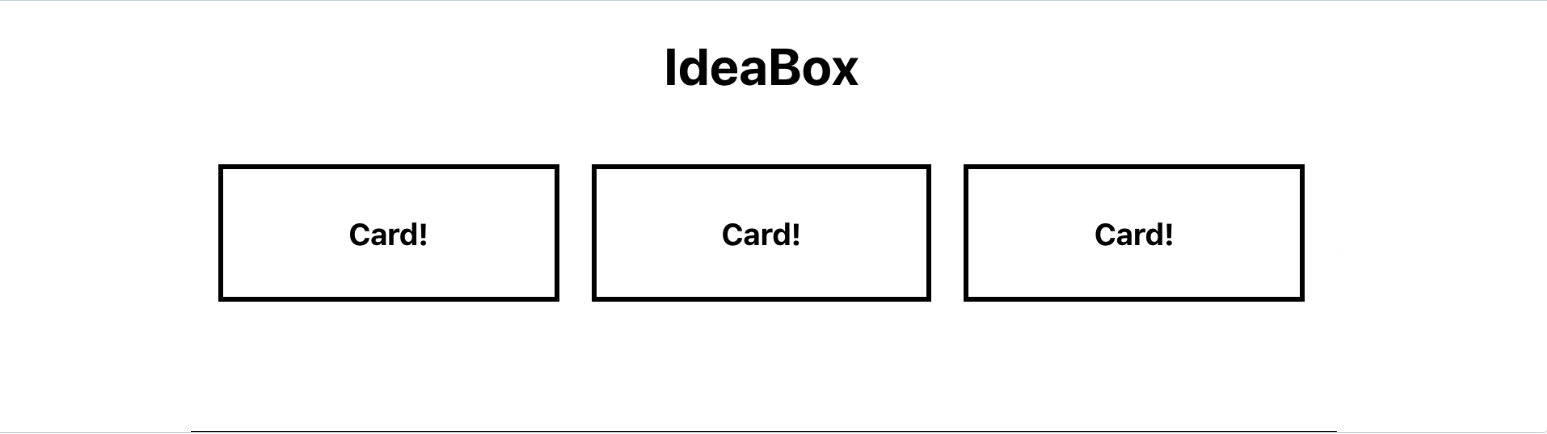
Then, in your Tasks component, let’s just try to get these hooked up properly.
// Tasks.jsx

import Card from "../Card/Card";
import "./Tasks.css";

function Tasks(props) {
  const { name } = props;

  return (
    <div className="tasks-container">
      <Card />
      <Card />
      <Card />
    </div>
  );
}

export default Tasks;
And let’s throw some CSS in just to make our cards look like not a hot garbage fire:
/* Tasks.css */

.tasks-container {
  padding: 20px;
  display: grid;
  grid-template-columns: repeat(3, 1fr);
  grid-gap: 20px;
}
And in your Card css file:
/* Card.css */

.card {
  box-sizing: border-box;
  border: 3px solid black;
  padding: 10px;
}
Okay! Hopefully your app looks like this:
All right, friends. Let’s get to passing some PROPS! Let’s go all the way back to our App component and pass our list of tasks to the Tasks container component, so that it can then create Card components out of each individual task.
// App.jsx

return (
  <main className="App">
    <h1>Task Manager</h1>
    <Tasks tasks={tasks} />
  </main>
);
Let’s unpack what we’re doing here. We created a new prop called “tasks”, and the value we’re passing in is our array of tasks (data) which lives in the App component’s state. Remember, tasks is JavaScript, not HTML, so we need to wrap it in curly brackets!
Go look at the Tasks component in your React dev tools in the browser. You should see that the props contain a key of “tasks” with a value of the array of tasks from App state!
We now want to iterate through our array and create a Card component, passing it the information it needs to display the proper information!
// Tasks.jsx

import Card from "../Card/Card";
import "./Tasks.css";

function Tasks({ tasks }) {
  const taskCards = tasks.map((task) => {
    return <Card title={task.title} description={task.description} id={task.id} key={task.id} />;
  });

  return <div className="tasks-container">{taskCards}</div>;
}

export default Tasks;
Okay - we’ve made a few changes! You’ll notice that we’re now destructuring the props as we pass them in! W H A T. I know. Then, we’re mapping over the tasks array and creating a new array of Card components, each with props of title and name. The key property is something that React requires when using map() to create elements. In this case, I’m just using the unique id that each task has.
Remember that map takes an array and transforms all of the elements. Here, we are transforming all of the JS objects into
Cardcomponents.
If you look in your React dev tools, you’ll see that the Card components now has props of “title” and “description”!
Go ahead a change Card so we display that information.
// Card.jsx

import "./Card.css";

function Card({ title, description, id }) {
  return (
    <div className="card">
      <h3>{title}</h3>
      <p>{description}</p>
      <button>🗑</button>
    </div>
  );
}

export default Card;
I created a button to delete the Card, but we’ll get to that later. For now, let’s celebrate, because we just got this sucker to display some tasks!!
Conditional Rendering
Before me move on, lets tighten up the UX here a bit.
Explore
- What if we didn’t have any
dummyTasksto start?- In your
useStateline of code, replace thedummyTaskswith an empty array so that ourtasksstate starts as an empty array.
- In your
- What happens? Why?
- What would make for a better user experience?
To handle the logic for this, we can use Conditional Rendering.
Conditional rendering is exactly what it sounds like: telling a component to render something based on a condition. We put some JS into our component’s render function, and tell it what to put on the DOM based on some set of conditions. Let’s add some here!
Currently your App component looks like this:
// App.jsx

import { useState } from "react";
import "./App.css";
import Tasks from "../Tasks/Tasks";

function App() {
  const dummyTasks = [
    { id: 1, title: "Prank Travis", description: "Stick googly eyes on all his stuff" },
    {
      id: 2,
      title: "Make a secret password app",
      description: "So you and your rideshare driver can both know neither one of you is lying",
    },
    { id: 3, title: "Learn a martial art", description: "To exact vengeance upon my enemies" },
  ];
  const [tasks, setTasks] = useState([]);

  return (
    <main className="App">
      <h1>Task Manager</h1>
      <Tasks tasks={tasks} />
    </main>
  );
}

export default App;
We want to add conditional logic that essentially says, if there aren’t any tasks to display, display an <h2> inviting users to add some tasks.
In plain JS, what could this conditional look like?
if (!tasks.length) {
  // return an h2 saying to add some tasks
}
We can use curly braces to inject JS into our JSX. However, we need whatever is inside of our curlies to evaluate to the HTML we want rendered, so we’ll use React’s conditional rendering syntax like this:
// App.jsx

return (
  <main className="App">
    <h1>Task Manager</h1>
    {!tasks.length && <h2>No tasks yet -- add some!</h2>}
    <Tasks tasks={tasks} />
  </main>
);
If this syntax feels weird, take a look at the logical && operator’s docs.
What does the operator return?
The code above says that, if the expression on the left side of the && is true, return the expression on the right side. So if there are no tasks in state, return (aka render) our h2!
Go ahead and pass your dummyTasks back into your useState hook. Later, when we set up the ability to delete tasks, we should see our <h2> anytime there are no tasks in the tasks array in state.
Form.jsx
Let’s move on to our Form component. We’re going to create what is known as a controlled form.
In the Form directory we created earlier, create the Form.jsx and Form.css files.
/* Form.css */

form {
  margin: auto;
}

input,
button {
  margin: 5px;
  width: 30%;
  border: 2px solid black;
  font-size: 18px;
}
Our Form component will start like this:
// Form.jsx

import { useState } from "react";
import "./Form.css";

function Form() {
  const [title, setTitle] = useState("");
  const [description, setDescription] = useState("");

  return (
    <form>
      <input type="text" placeholder="Title" name="title" value={title} />

      <input type="text" placeholder="Description" name="description" value={description} />

      <button>SUBMIT</button>
    </form>
  );
}

export default Form;
Now that we have our Form files started, we can connect our Form to our App component so it will render.
First, import the Form in App.jsx.
import Form from "../Form/Form";
Then, render the Form in App’s return.
// App.jsx

return (
  <main className="App">
    <h1>Task Manager</h1>
    {!tasks.length && <h2>No tasks yet -- add some!</h2>}
    <Form />
    <Tasks tasks={tasks} />
  </main>
);
But we also need to write some functions. Let’s go back to our Form and make sure that when we type into our inputs, they update the Form’s state.
// Form.jsx

import { useState } from "react";
import "./Form.css";

function Form({ addTask }) {
  const [title, setTitle] = useState("");
  const [description, setDescription] = useState("");

  function submitTasks(event) {
    event.preventDefault();

    const newTask = {
      title,
      description,
    };

    addTask(newTask);
    clearInput();
  }

  function clearInput() {
    setTitle("");
    setDescription("");
  }

  return (
    <form>
      <input
        type="text"
        placeholder="Title"
        name="title"
        value={title}
        onChange={(event) => setTitle(event.target.value)}
      />

      <input
        type="text"
        placeholder="Description"
        name="description"
        value={description}
        onChange={(event) => setDescription(event.target.value)}
      />

      <button onClick={(event) => submitTasks(event)}>SUBMIT</button>
    </form>
  );
}

export default Form;
What is this setTitle business?
It’s a function created using useState hook to manage the state of the title.
The useState hook returns an array with two elements. The current state value in this case an empty string and a function to update the state in this case setTitle.
OK, let’s go back to setTitle and what is happening in the onChange.
So when the onChange event listener is triggered by the user typing something into the input field, the setTitle function is called with the new value of the input as an argument. This updates the state of the title variable with the new value, causing a re-render of the component with the updated state.
Take a look at your React dev tools - is the state updating as you type into the inputs?
When we click the submit button, what do we want to happen?
We want to create an object out of the new task and add it to the list of tasks that App is holding onto in state. How do we access App’s state from inside our Form component?
Passing functions
In App, we’re going to have to create an addTask function that updates App’s state. Then we’ll pass that function into our Form as a prop.
Place the addTask function underneath the useState line.
// App.jsx

function addTask(newTask) {
  setTasks([...tasks, newTask]);
}

return (
  <main className="App">
    <h1>Task Manager</h1>
    {!tasks.length && <h2>No tasks yet -- add some!</h2>}
    <Form addTask={addTask} />
    <Tasks tasks={tasks} />
  </main>
);
This is a callback function that takes a newTask object as an argument, and adds it to the existing tasks array by creating a new array using the spread operator (...), to copy the existing tasks array and adding the new task to the end of it.
This updated array is then set as the new state of tasks using the setTasks function which is the state updater function created by the useState hook.
This is good, because we’re passing it down as a prop to the Form component!
Now, in the Form component, let’s make use of the addTask function we passed as a prop. To access addTask we’ll need to declare ‘props’ as a parameter in our functional Form component then use dot notation to access props.addTask. Or, we could use destructuring to allow us to directly reference addTask without having to use dot notation.
We’re also creating a submitTasks function in the Form component that will format the newTask to be passed into the invocation of the addTask prop. The submitTasks function will be invoked on the Form’s button click.
// Form.jsx

import { useState } from "react";
import "./Form.css";

function Form({ addTask }) {
  const [title, setTitle] = useState("");
  const [description, setDescription] = useState("");

  function submitTasks(event) {
    event.preventDefault();

    const newTask = {
      title,
      description,
    };

    addTask(newTask);
    clearInput();
  }

  function clearInput() {
    setTitle("");
    setDescription("");
  }

  return (
    <form>
      <input
        type="text"
        placeholder="Title"
        name="title"
        value={title}
        onChange={(event) => setTitle(event.target.value)}
      />

      <input
        type="text"
        placeholder="Description"
        name="description"
        value={description}
        onChange={(event) => setDescription(event.target.value)}
      />

      <button onClick={(event) => submitTasks(event)}>SUBMIT</button>
    </form>
  );
}

export default Form;
Now that we have the ability to add new tasks, go a head a give it a whirl. Neat huh?
Deleting a Card
Now that you know how to use a function and props to allow a different component to update App’s state, see if you can get each Card’s delete button to work.
First, write the App function to delete an task from state and pass it to the Tasks component:
// App.jsx

import "./App.css";
import Tasks from "../Tasks/Tasks";
import Form from "../Form/Form";
import { useState } from "react";

function App() {
  const dummyTasks = [
    { id: 1, title: "Prank Travis", description: "Stick googly eyes on all his stuff" },
    {
      id: 2,
      title: "Make a secret password app",
      description: "So you and your rideshare driver can both know neither one of you is lying",
    },
    { id: 3, title: "Learn a martial art", description: "To exact vengeance upon my enemies" },
  ];
  const [tasks, setTasks] = useState(dummyTasks);

  function addTask(newTask) {
    setTasks([...tasks, newTask]);
  }

  function deleteTask(id) {
    console.log(id);
    const filteredTasks = tasks.filter((task) => task.id !== id);
    setTasks(filteredTasks);
  }

  return (
    <main className="App">
      <h1>Task Manager</h1>
      {!tasks.length && <h2>No tasks yet -- add some!</h2>}
      <Form addTask={addTask} />
      <Tasks tasks={tasks} deleteTask={deleteTask} />
    </main>
  );
}

export default App;
Second, pass the deleteTask function to each Card that the Tasks component creates:
// Tasks.jsx

import "./Tasks.css";
import Card from "../Card/Card";

function Tasks({ tasks, deleteTask }) {
  const taskCards = tasks.map((task) => {
    return (
      <Card
        title={task.title}
        description={task.description}
        id={task.id}
        key={task.id}
        deleteTask={deleteTask}
      />
    );
  });

  return <div className="tasks-container">{taskCards}</div>;
}

export default Tasks;
Third, create an event listener on the Card button:
// Card.jsx

import "./Card.css";

const Card = ({ title, description, id, deleteTask }) => {
  return (
    <div className="card">
      <h3>{title}</h3>
      <p>{description}</p>
      <button onClick={() => deleteTask(id)}>🗑</button>
    </div>
  );
};

export default Card;
Voila! You’ve created a React application!
Great, we now have a fully functioning React application that has the ability to display tasks. But right now all of the tasks we’re displaying are hard-coded. Wouldn’t it be great if we could actually fetch data dynamically from a server? Let’s do that!
The fetch API
The fetch API is a built-in JavaScript interface that allows you to make HTTP requests to servers. Instead of using our hard-coded dummyTasks, we can use fetch to get real data from a server.
Setting up our API requests
First, let’s create a separate file to handle our API calls. This helps keep our code organized and makes it easier to maintain.
- Create a new directory called
apiCallsin yoursrcdirectory - Inside that directory, create a file called
apiCalls.js - Add the following code to the file:
// src/apiCalls/apiCalls.js

const baseEndpoint = "http://localhost:3000/api/v1/tasks";

async function getTasks() {
  const response = await fetch(baseEndpoint);

  if (!response.ok) {
    throw new Error(`HTTP error! Status: ${response.status}`);
  }

  return response.json();
}

async function postTask(newTask) {
  const response = await fetch(baseEndpoint, {
    method: "POST",
    headers: {
      "Content-Type": "application/json",
    },
    body: JSON.stringify(newTask),
  });

  if (!response.ok) {
    throw new Error(`HTTP error! Status: ${response.status}`);
  }

  return response.json();
}

async function deleteTask(id) {
  const response = await fetch(`${baseEndpoint}/${id}`, {
    method: "DELETE",
  });

  if (!response.ok) {
    throw new Error(`HTTP error! Status: ${response.status}`);
  }

  return response.json();
}

export { getTasks, postTask, deleteTask };
In this file, we’ve created three functions that handle different types of API requests:
getTasks()- Fetches all tasks (GET request)postTask(newTask)- Creates a new task (POST request)deleteTask(id)- Deletes a task by ID (DELETE request)
Each function uses async/await syntax. Adding async/await to our functions is like saying, “I know this operation could take a while, and I want to make sure it doesn’t block the rest of my application while I am performing this task”.
Updating App.jsx to use fetch
Now, let’s modify our App.jsx file to use these API calls instead of the hard-coded data:
// App.jsx

import "./App.css";
import Tasks from "../Tasks/Tasks";
import Form from "../Form/Form";
import { useState, useEffect } from "react";
import { getTasks, postTask, deleteTask } from "../../apiCalls/apiCalls";

function App() {
  const [tasks, setTasks] = useState([]);
  const [error, setError] = useState("");

  // Fetch tasks when component mounts
  useEffect(() => {
    const fetchTasks = async () => {
      try {
        const responseData = await getTasks();
        setTasks(responseData);
        setError("");
      } catch (error) {
        setError("Unable to fetch tasks.");
      }
    };

    fetchTasks();
  }, []);

  // Add a new task
  async function addTask(newTask) {
    try {
      const data = await postTask(newTask);
      setTasks([...tasks, data]);
      setError("");
    } catch (error) {
      setError("Unable to create task.");
    }
  }

  // Delete a task
  async function deleteTaskById(id) {
    try {
      await deleteTask(id);
      const filteredTasks = tasks.filter((task) => task.id !== id);
      setTasks(filteredTasks);
      setError("");
    } catch (error) {
      setError("Unable to delete task.");
    }
  }

  return (
    <main className="App">
      <h1>Task Manager</h1>
      {error && <h2 className="error-msg">{error}</h2>}
      {!tasks.length && !error && <h2>No tasks yet -- add some!</h2>}
      <Form addTask={addTask} />
      <Tasks tasks={tasks} deleteTask={deleteTaskById} />
    </main>
  );
}

export default App;
Let’s break down the changes we’ve made:
The useEffect Hook
The useEffect hook allows us to perform side effects in our components. In this case, we’re using it to fetch data from our API when the component first renders.
// App.jsx

useEffect(() => {
  const fetchTasks = async () => {
    try {
      const responseData = await getTasks();
      setTasks(responseData);
      setError("");
    } catch (error) {
      setError("Unable to fetch tasks.");
    }
  };

  fetchTasks();
}, []);
Key points about this implementation:
- The empty array
[]as the second argument tells React that this effect should only run once, when the component mounts. - We’re using error handling with
try/catch:- The
tryblock contains the code that might throw an error, similar tobeginin Ruby. - The
catchblock handles any errors that occur, similar torescuein Ruby.
- The
Updated Form Component
Let’s update our Form component to work with our API:
// Form.jsx

import { useState } from "react";
import "./Form.css";

function Form({ addTask }) {
  const [title, setTitle] = useState("");
  const [description, setDescription] = useState("");

  function submitTasks(event) {
    event.preventDefault();

    // Remove `id` since we'll be getting the id for each task from the server
    const newTask = {
      title,
      description,
    };

    addTask(newTask);
    clearInput();
  }

  function clearInput() {
    setTitle("");
    setDescription("");
  }

  return (
    <form>
      <input
        type="text"
        placeholder="Title"
        name="title"
        value={title}
        onChange={(event) => setTitle(event.target.value)}
      />

      <input
        type="text"
        placeholder="Description"
        name="description"
        value={description}
        onChange={(event) => setDescription(event.target.value)}
      />

      <button onClick={(event) => submitTasks(event)}>SUBMIT</button>
    </form>
  );
}

export default Form;
Testing Your API Integration
To test your API integration:
- In your Task Manager API application, make sure that
gem "rack-cors"is included in yourGemfile. - In
app/config/initializers/cors.rb, ensure you whitelist your React app as a trusted source:
# app/config/initializers/cors.rb

Rails.application.config.middleware.insert_before 0, Rack::Cors do
  allow do
    origins "localhost:5173"

    resource "*",
      headers: :any,
      methods: [:get, :post, :put, :patch, :delete, :options, :head]
  end
end
- Make sure your API server is running at
http://localhost:3000 - Ensure your endpoints match (
/api/v1/tasks) - Restart your React app and try adding, viewing, and deleting tasks
If you haven’t created the Task Manager API yet, follow the Task Manager API tutorial.
Reflection
- How does using
fetchimprove your application compared to using hard-coded data? - What challenges might arise when dealing with API requests in a real-world application?
- How could you add error handling to your API to improve the error handling in this application?
- How would you implement more complex features like sorting or filtering tasks?
Review
Want to dig deeper?
Fully Optional Extensions - Not at all Expected
- Look ahead to the React: Advanced Data Management lesson
- Open a branch.
- Update the UI to add some additional styling.
- colors
- flexbox
- etc.
- Try adding functionality for showing a single task when you click that task, and updating a task. (Hint: You will need to create a form for the update.)
</section>
- Update the UI to add some additional styling.
Take a few minutes to journal:
- What “aha” moments did you have?
- Which concepts are the fuzziest for you right now?
- Which concepts are the clearest for you right now?
- What do you know about functional components?
- What do you know about hooks?
- What do you know about state?
- What do you know about passing props?
- What questions do you have? (post these in codehelp!)