Hang In There - Solo
Learning Goals
- Practice reading, understanding, and using existing code
- Write clean, DRY JavaScript
- Build out functionality using functions that show trends toward SRP
- Manipulate the page after it has loaded by adding, removing, and updating elements on the DOM
- Use array prototype iterator methods to reformat data and display it on the DOM
- Use CSS and HTML to match styling and layout of provided comps
Overview
Sometimes you need a pick me up. Remember those motivational posters that were all over the place in classrooms and online? We’re going to make our own!
Resources
Helpful Hints
Why are our PRs pushing to the Turing repo?
Forks are typically used to let someone propose changes to your project, that would eventually be merged back into the original repo you forked from. So a fork will always remain connected to the original repo.
When merging a PR, you should see a dropdown to select which repo you want to merge to. You can select the original repo or your fork (you want to choose your fork).
If you want to change the default, follow the steps here.
Where are our console logs?
If you console log something in your project, you’ll see it in the dev tools console when you open the page in your browser (open index.html). Nothing will appear in your terminal. Remember, you need to refresh the browser each time you make an update to your code.
Deploying - Deployment is optional and not expected for this project
Deploying your repos allows you to have a live site for your application. You’ll be able to share this link with friends and family to show off what you’re learning! You will also include deploy links on your resume so potential employers can see what you’ve built!
Deploying takes time, so it’s not a good idea to use your deployed site as your point of reference while building your app. While you’re coding, you’ll want to run open index.html in your terminal to see the current local version of your app. You need to refresh the browser each time you make an update to your code. Once you’ve pushed up your code and merged into the main branch, the deployed site should update within an hour.
Deployment is optional and not expected for this project. If you do want to deploy, GH Pages is a good option for simple FE application like this one.
Below are instructions for deploying to GH Pages:
- Repo Settings » Pages » Select the main branch as your Source branch » Save. Then, wait up to an hour, hit refresh, and your deployed link should appear at the top of the screen.

- If you don't want to wait, your GH pages URL will follow this format: "https://username.github.io/hang-in-there/". Replace "username" with the repo owner's GH username and "hang-in-there" with your repo's name (if different). The URL will not work right away - that's ok! Add it to the Project Submission form anyway.
Refactoring as You Go
Between each iteration, take some time to look at the code you’ve written and make any changes that might improve the readability of your code. Refactoring as you go can help ensure that everyone understands the code you’ve written so far AND make it easier to build on top of that code.
Here are some ideas of what to look for:
- Is our indentation and spacing consistent?
- Are our variable names descriptive of the values they hold? Do they follow common convention (i.e. arrays are plural, etc)?
- Are our function names descriptive of what the function does? Are they named with present tense verbs?
- Are any of our functions too big or doing too many things? Should we break any of them up so they each have only one job (SRP - Single Responsibility Principle)?
- Is any of our JS code too repetitive? Could we make any reusable functions with parameters and arguments?
Remember - shorter code isn’t always better!
Refactoring is valuable, but you shouldn’t spend so much time trying to perfect your code that it prevents you from working through the iterations.
Progression
Set Up + Day 1 Deliverables
- Fork the repository found here: https://github.com/turingschool-examples/hang-in-there-boilerplate/.
- Use the command
git clone <url> <newNameYouWantItToHave>to clone down your new, forked repo and rename it. The name should not include “boilerplate”. cdinto the repository- Open it in your text editor
code . - View the project in the browser by running
open index.htmlin your terminal
Then:
- Explore the repository to see what’s going on in the code. Look at each file.
- What pieces of the existing code might you use to complete iterations, and what pieces will you have to create?
- All of your JavaScript will be written in
main.js. You will make edits and additions to the html and css files.
By EOD on Kick Off Day:
- Read the entire project spec and rubric. Post questions in slack.
- Add the Instructors as collaborators to your forked repository.
Iteration 0 - Main Page

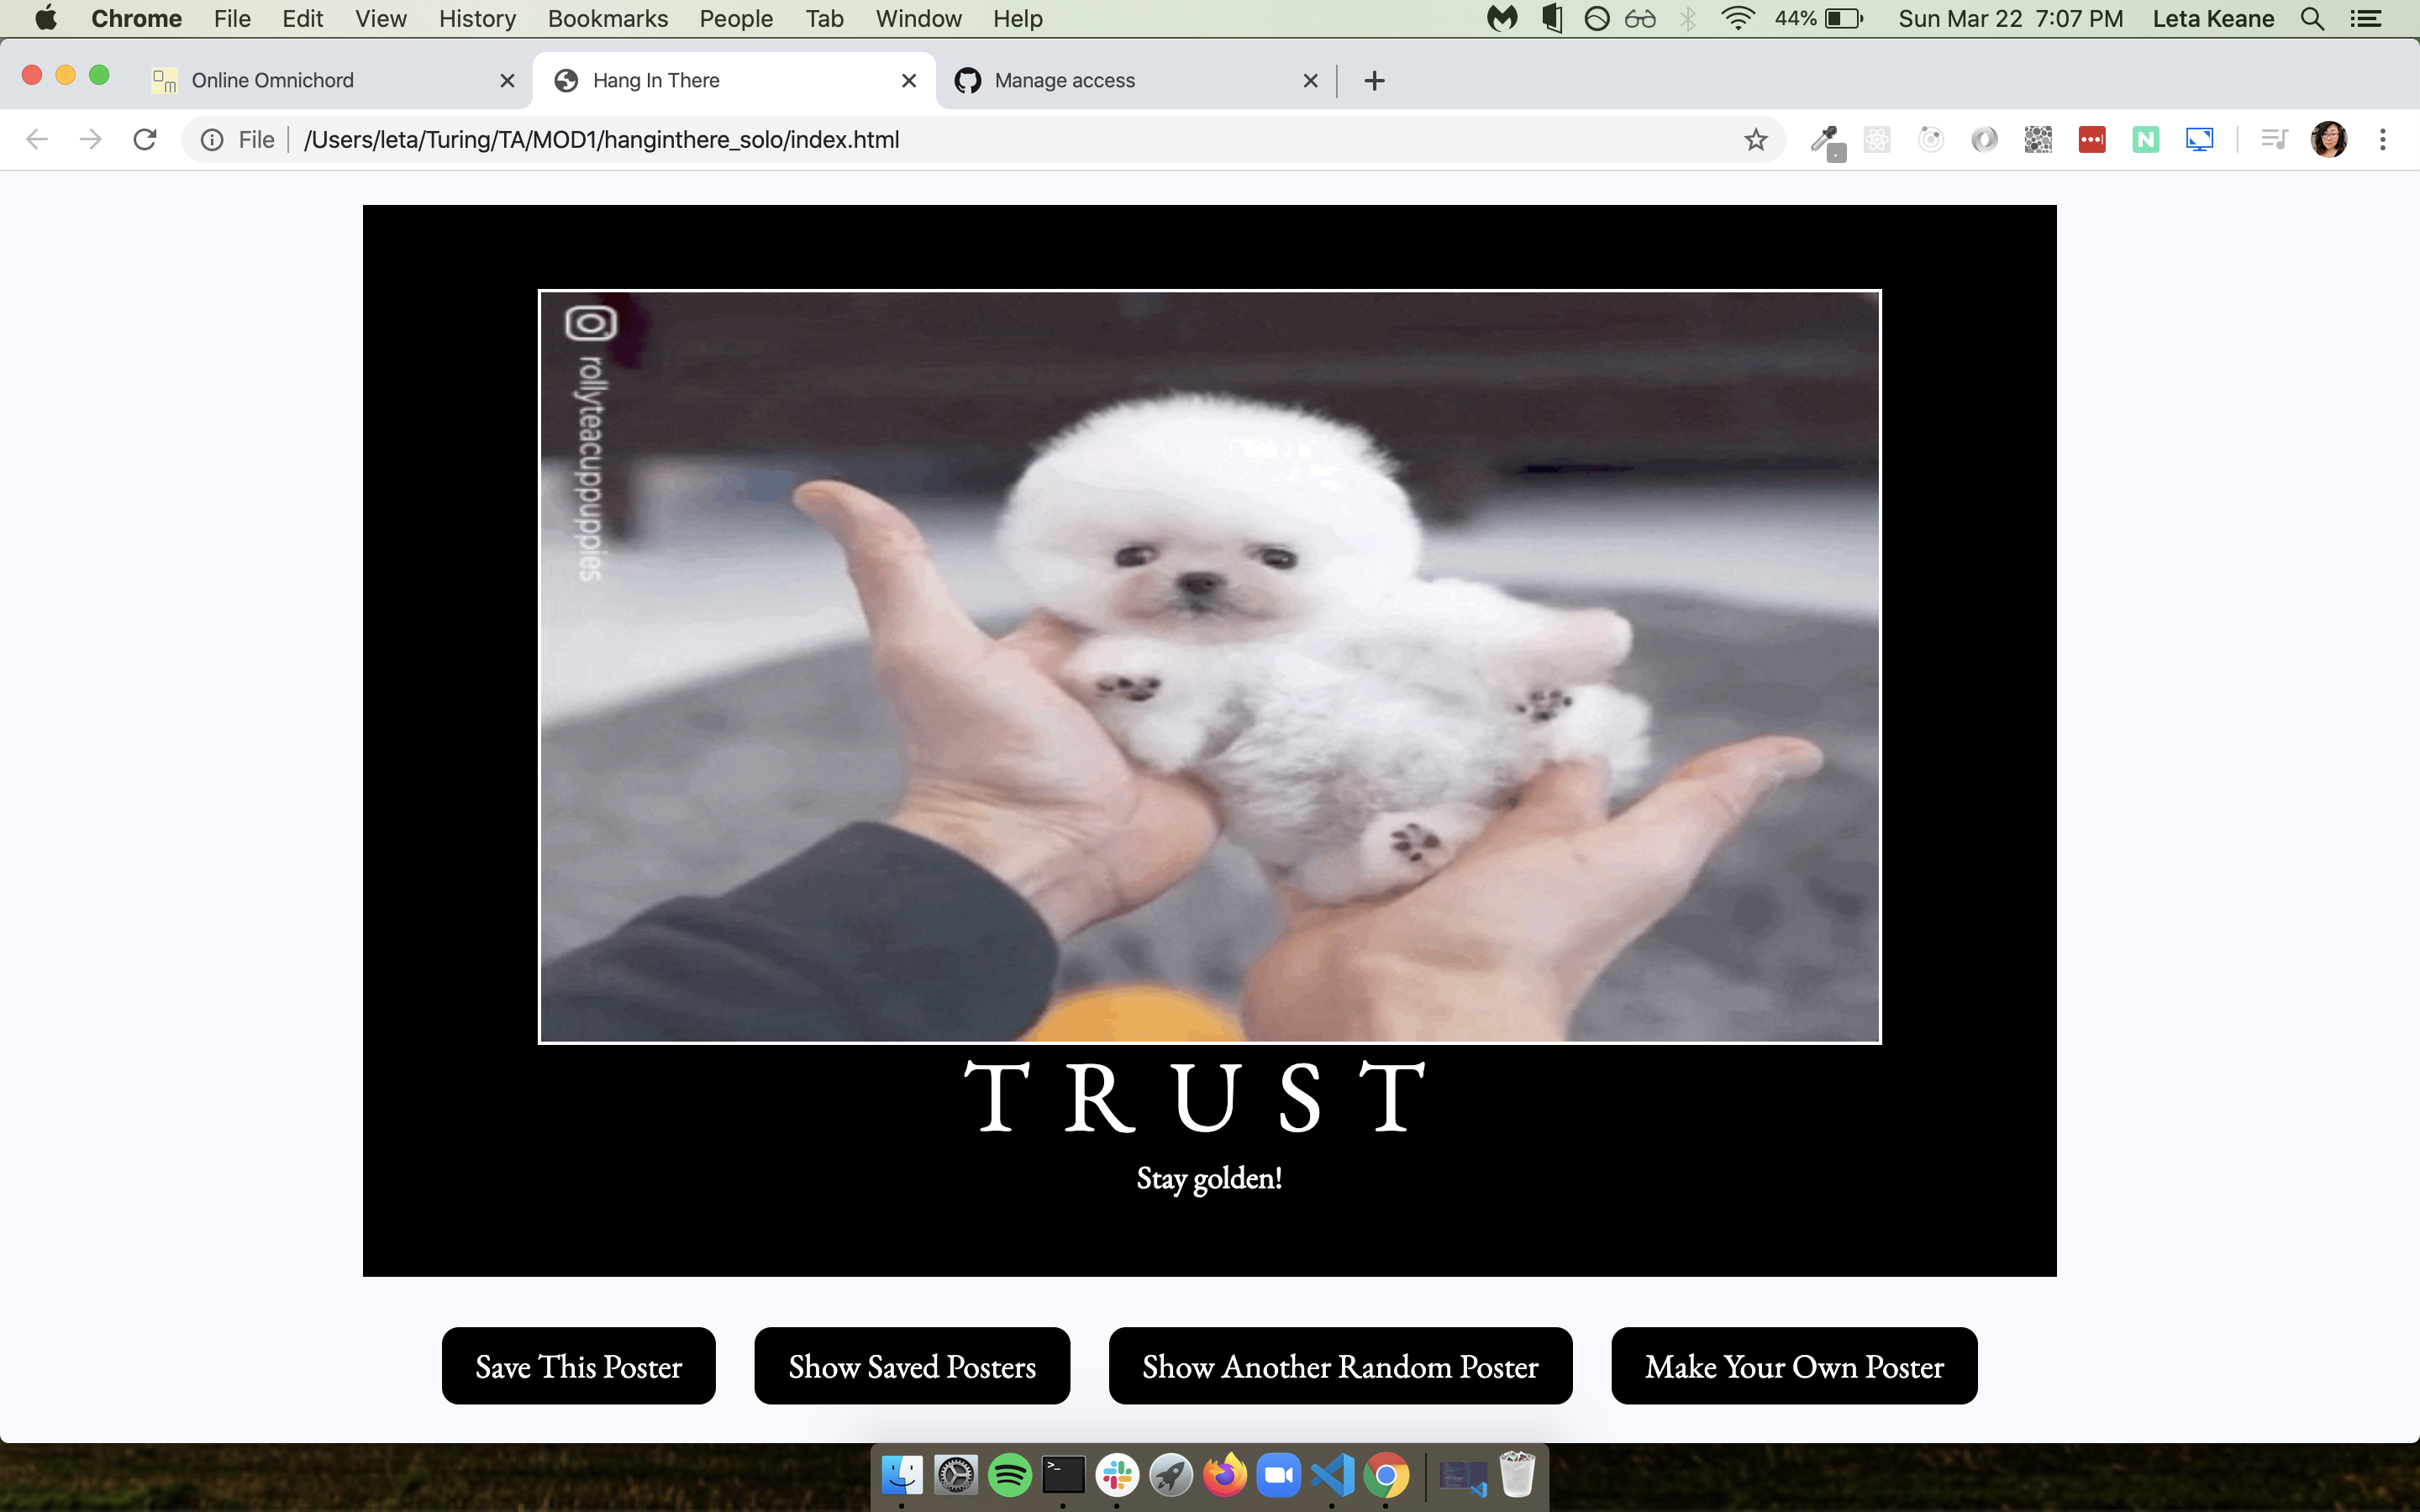
- When the page loads, users should see a poster with a randomly selected image, title, and quote
- Every time the user clicks the Show Random Poster button, a new random poster is displayed.
Note: Figuring out where to even start can be the hardest and the most overwhelming part of a new project. When you’re frozen in that, just start somewhere - anywhere.
Ask yourself: “What’s one small thing, anything, I could do to get started? Maybe just adding a console log to see some data?”
Then, as you go and start to build momentum, continue to ask “What am I actually trying to do right now?” “Ok, what am I trying to do next?” “What do I want THIS line of code to do, just this line?”
Iteration 1 - Switching Views
Form view:

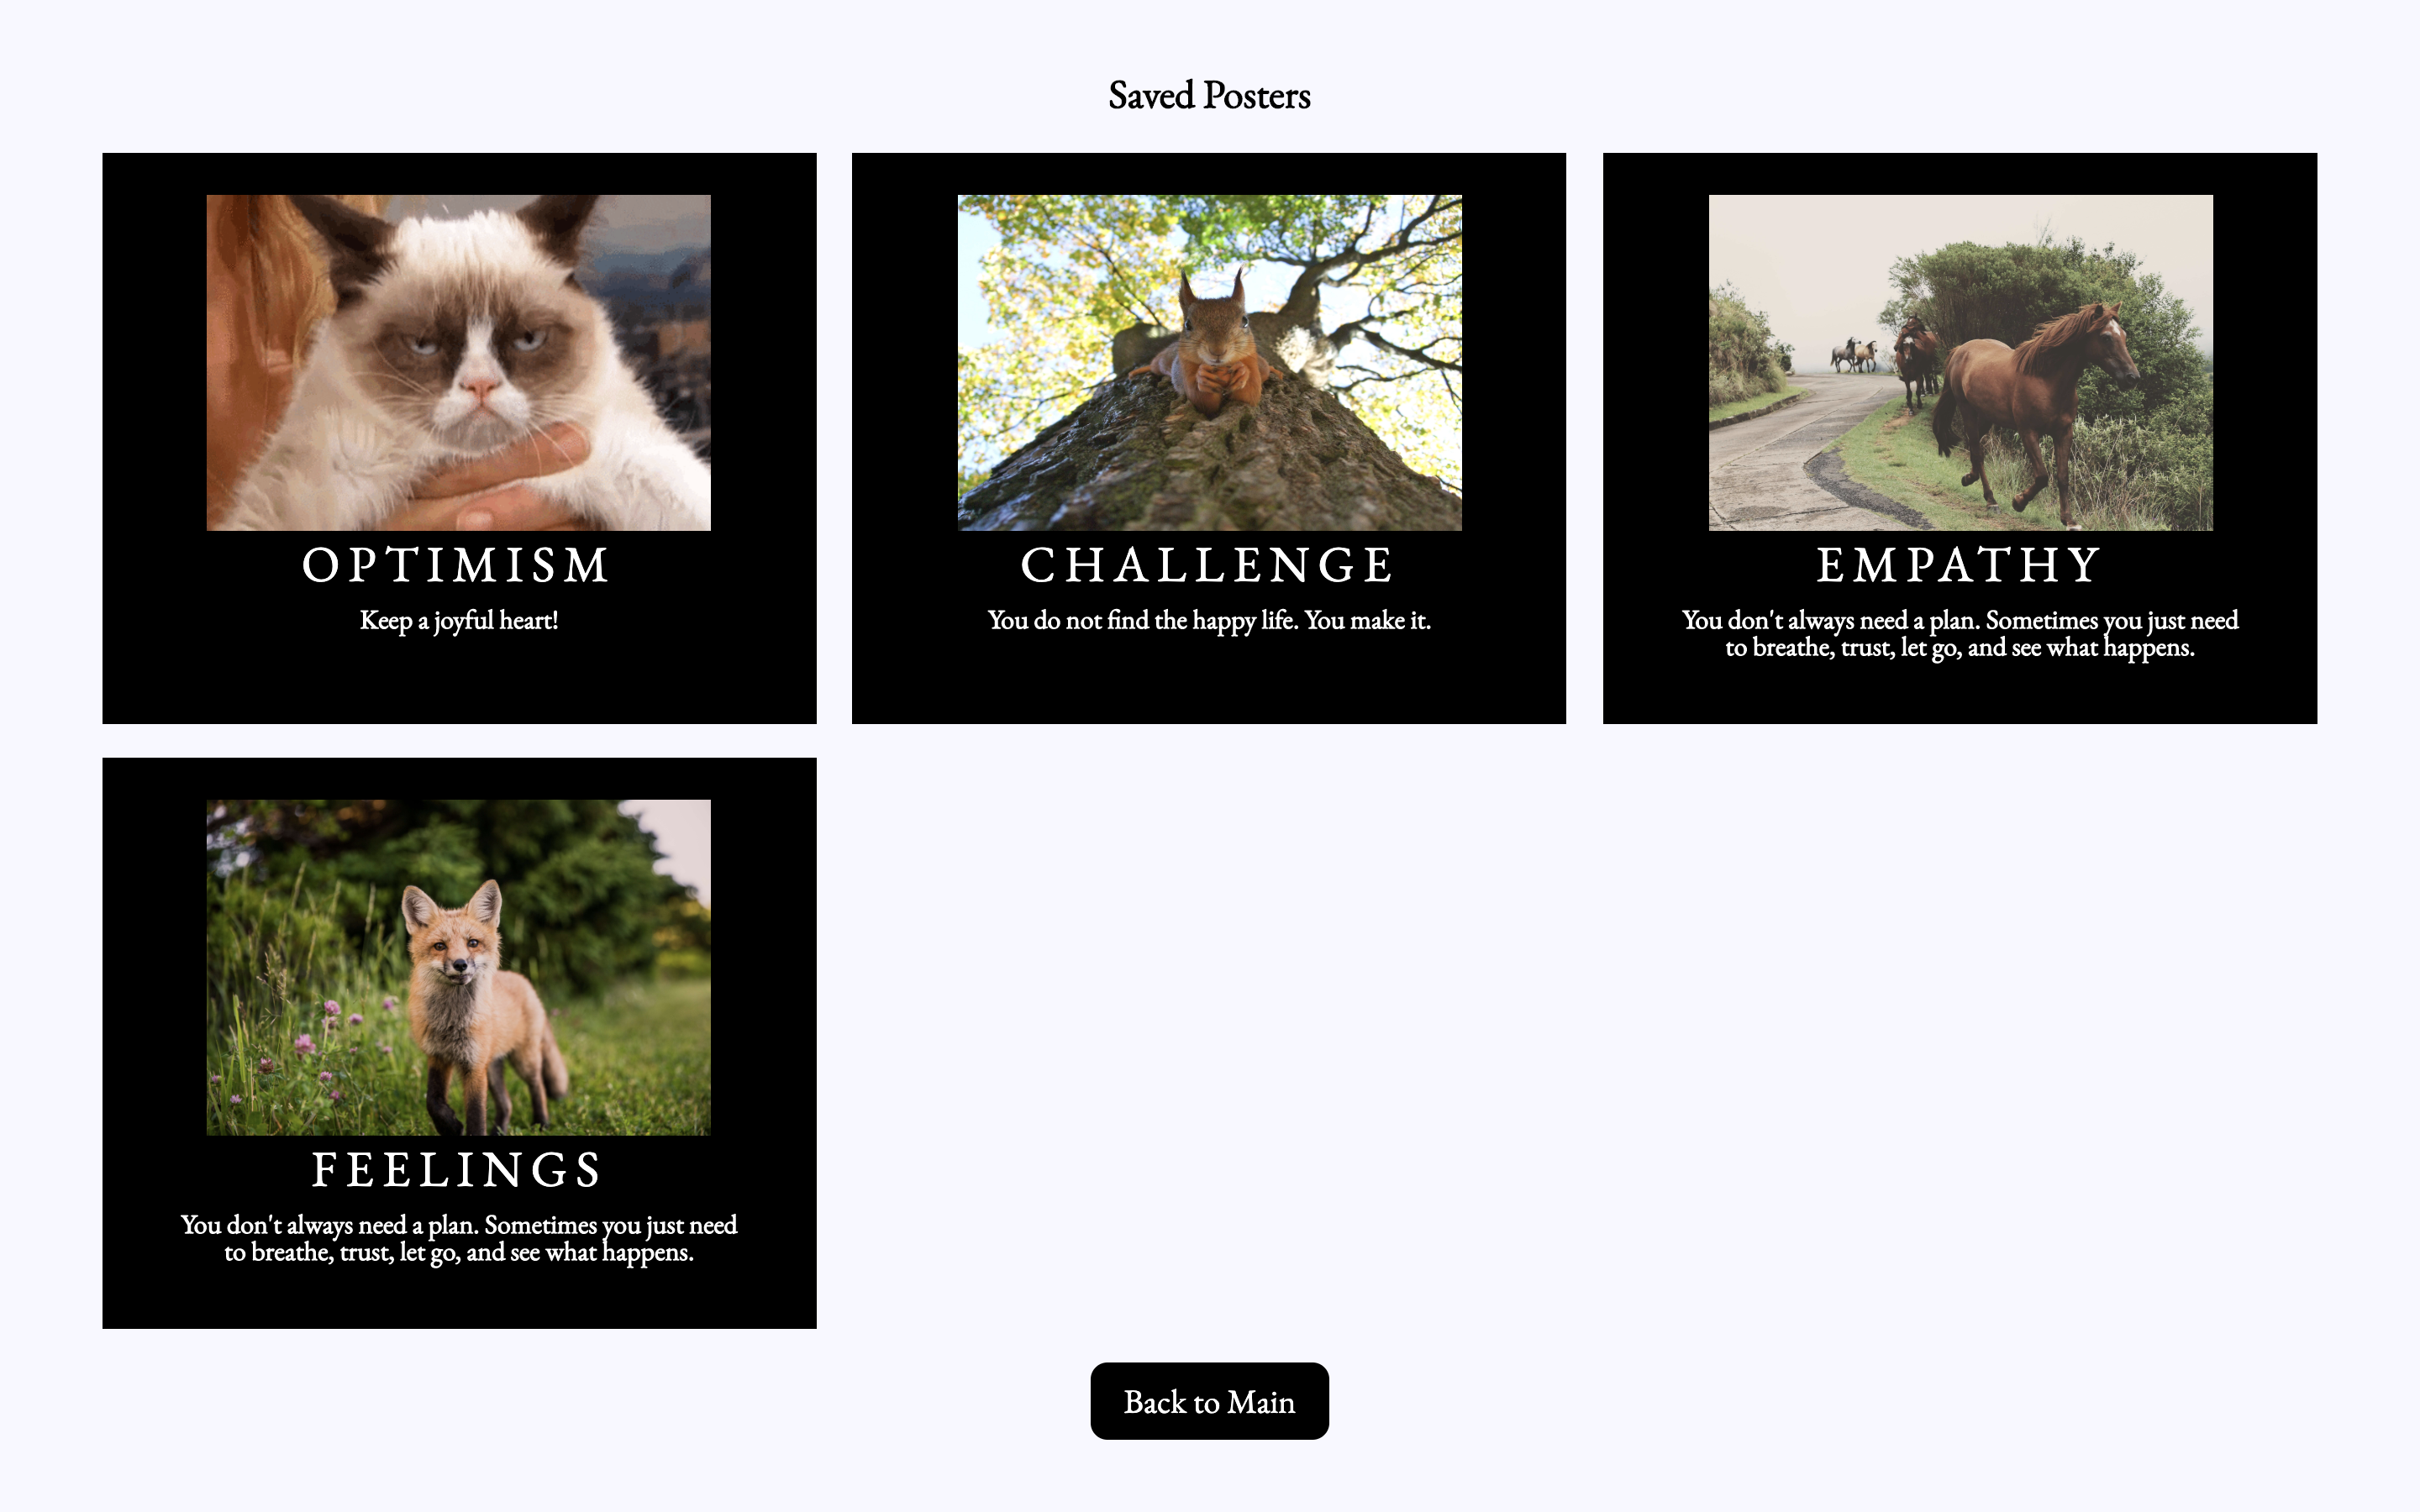
Saved posters view:

NOTE: We are NOT working on the new poster form in this iteration! We’re only changing views with the main page buttons and the back buttons. The new poster form is iteration 2, dont work ahead.
- When a user clicks the “Make Your Own Poster” button, we should see the form, and the main poster should be hidden
- When a user clicks the “Show Saved Posters” button, we should see the saved posters area, and the main poster should be hidden
- When a user clicks the “Nevermind, take me back!” or “Back to Main” buttons, we should only see the main poster section
- In summary: Be able to switch between the three views (main poster, form, and saved posters) on the correct button clicks
Hint: We aren’t actually navigating different pages of a website here. Instead, we will fake that navigation by hiding and unhiding entire sections. Go check out the HTML and CSS files to see how the form and saved posters sections are being hidden in the first place.
Consider how you might use arguments/parameters to make dynamic reusable functions to control what is shown/hidden.
Iteration 2 - Creating a New Poster
Result after clicking Show My Poster button:

- On the new poster form view, users should be able to fill out the three input fields and then hit the Show My Poster button
- Hint:
Notice something weird happening when you click the button to submit the form? Try googling
event.preventDefault()!
- Hint:
Notice something weird happening when you click the button to submit the form? Try googling
NOTE: Work through these bullet points in order. They’ll have you update the data model first, then use that updated data model to change what is showing to the user on the DOM.
- When the Show My Poster button is clicked, several things will happen:
- First, use the values from the inputs to create a new, unique poster object and save it as the value of the
currentPosterglobal variable (part of your data model) - Save the submitted data into the respective arrays (image URL into the images array, etc - all part of your data model) so that future random posters can use the user-created data
- Change back to the main poster view (hiding the form view again)
- Use the new, unique poster object (which should be saved in the
currentPostervariable - part of your data model) to display the newly created poster image, title, and quote in the main view on the DOM
- First, use the values from the inputs to create a new, unique poster object and save it as the value of the
Iteration 3 - Saving & Viewing Posters
- When a user clicks the “Save This Poster” button, the current main poster will be added to the
savedPostersarray. - If a user clicks the “Save This Poster” more than once on a single poster, it will still only be saved once (no duplicates)
- When a user clicks the “Show Saved Posters” button, we should see the saved posters section
- All the posters in the
savedPostersarray should be displayed as little mini posters in the saved posters grid section (again, no duplicates) - Ensure styling, sizes and layouts of the mini posters in the Saved Posters view match the comp photo of that Saved Posters view that is shown in Iteration 1
Hint: What existing classes and styles are already written in your css that you can use to get the correct styling for your mini posters in the Saved Posters view?
Iteration 4 - Feature Add! Un-motivational Posters - Set Up and Data Display
The product team wants to expand the application with a new feature - Unmotivational Posters.
- On the main view, a user should see a newly added “Unmotivational Posters” button located after the existing buttons.
- When a user clicks the “Unmotivational Posters” button, we should see an newly created Unmotivational Posters html section with:
- a title of “Unmotivational Posters”
- a div that will eventually hold the displayed posters (not actually a visible part of the page until posters are displayed)
- a “Back to Main” button
- The main poster view should be hidden when viewing the Unmotivational Posters view
- When a user clicks the “Back to Main” button, we should see the main poster view and the unmotivational posters view should be hidden.
Hint:
You will be adding to the existing HTML. It’s valuable to pay close attention to the existing code and try to be consistent as you add on.
The data you’ll need to complete this feature is in the dataset below.
Un-motivational Posters Dataset
let unmotivationalPosters = [
  {
    name: "FAILURE",
    description: "Why bother trying? It's probably not worth it.",
    price: 68.00,
    year: 2019,
    vintage: true,
    img_url: "./assets/failure.jpg",
  },
  {
    name: "MEDIOCRITY",
    description: "Dreams are just that—dreams.",
    price: 127.00,
    year: 2021,
    vintage: false,
    img_url: "./assets/mediocrity.jpg",
  },
  {
    name: "REGRET",
    description: "Hard work rarely pays off.",
    price: 89.00,
    year: 2018,
    vintage: true,
    img_url:  "./assets/regret.jpg",
  },
  {
    name: "FUTILITY",
    description: "You're not good enough.",
    price: 150.00,
    year: 2016,
    vintage: false,
    img_url:  "./assets/futility.jpg",
  },
  {
    name: "DEFEAT",
    description: "It's too late to start now.",
    price: 35.00,
    year: 2023,
    vintage: false,
    img_url:  "./assets/defeat.jpg",
  },
  {
    name: "HOPELESSNESS",
    description: "Stay in your comfort zone; it's safer.",
    price: 112.00,
    year: 2020,
    vintage: true,
    img_url: "./assets/hopelessness.jpg",
  },
  {
    name: "LAZINESS",
    description: "You can't change anything.",
    price: 25.00,
    year: 2022,
    vintage: false,
    img_url: "./assets/laziness.jpg",
  },
  {
    name: "PROCRASTINATION",
    description: "Better to avoid failure by not trying at all.",
    price: 48.00,
    year: 2017,
    vintage: true,
    img_url: "./assets/procrastination.jpg",
  },
  {
    name: "DESPAIR",
    description: "Let someone else do it; you’ll just mess it up.",
    price: 73.00,
    year: 2015,
    vintage: false,
    img_url: "./assets/despair.jpg",
  },
  {
    name: "NEGLECT",
    description: "Happiness is overrated.",
    price: 160.00,
    year: 2019,
    vintage: true,
    img_url: "./assets/neglect.jpg",
  },
  {
    name: "FEAR",
    description: "Giving up is always an option.",
    price: 91.00,
    year: 2014,
    vintage: false,
    img_url: "./assets/fear.jpg",
  },
  {
    name: "APATHY",
    description: "No one cares about your effort.",
    price: 110.00,
    year: 2016,
    vintage: true,
    img_url: "./assets/apathy.jpg",
  },
  {
    name: "MISERY",
    description: "Why take risks when you can stay stagnant?",
    price: 55.00,
    year: 2021,
    vintage: false,
    img_url: "./assets/misery.jpg",
  },
  {
    name: "BLAME",
    description: "Expect disappointment and you'll never be disappointed.",
    price: 39.00,
    year: 2017,
    vintage: true,
    img_url: "./assets/blame.jpg",
  },
  {
    name: "DOUBT",
    description: "Success is for other people, not you.",
    price: 140.00,
    year: 2020,
    vintage: false,
    img_url: "./assets/doubt.jpg",
  }
];
Let’s assume this data was pulled from a database. Each object has more data than what we need for creating and displaying posters. Our posters only have, and only need, an id, imageURL, title and quote. We’ll want to clean this data before we use it in our application.
- Copy/paste the dataset into your main.js file after the existing arrays of images, titles and quotes.
- Create a cleanData() function to go through each piece of this data and make it match the format we’ve been using for our poster data.
- Hint - use the existing createPoster() function to help you accomplish this.
- Hint - you can reach for a for loop or an iterator method here - several options will work - it’s your choice!
- When a user visits the Unmotivational Posters view, we should see all 15 unmotivational posters displayed immediately. Use the cleaned data for this.
Note: Don’t worry about the layout or styling of your unmotivational posters quite yet. You’ll tackle that in iteration 6 after you’ve finished the functionality.
Iteration 5 - Deleting Unmotivational Posters
Our product team realizes that some users will love the Unmotivational Posters feature while others might feel like it harshes the positive vibe of the application. They’d like us to add functionality so that users will be able to delete an unmotivational poster by double clicking on it.
- From the unmotivational posters view, if a user double clicks a poster, it will be deleted
- If the user navigates away from the Unmotivational Posters view after deleting some posters, those posters should still be gone when they navigate back to that view. Note: However, because we aren’t implementing local storage, if a user refreshes the app, everything will be reset including deleted unmotivational posters and saved motivational posters. That’s ok.
Do’s and Dont’s
In FE development, the approach we want to follow is updating the data model (like your array) first, then using the updated data model to update what the user can see on the DOM.
You’ll need to follow the same approach we used in the DOM Manipulation II lesson to accomplish this delete functionality. You’ll add your event listener to the entire parent container, then use logic to isolate the specific poster that was clicked on, remove it from the data model, then use the updated data model to change what is showing on the DOM.
Don’t:
- Don’t use HTML
onclickattributes in any code - all functionality should be through JavaScript. - Don’t use
.remove()to forcibly remove the deleted poster off the DOM. - Don’t add eventListeners to each unmotivational poster as you render them. All eventListeners should be in one section toward the top of your file, not included in dynamically added elements. Use the approach outlined above instead.
- Don’t use querySelector to grab the poster to be deleted. All querySelectors should be in one section at the top of your file, not sprinkled throughout your code in functions.
Do:
- Ensure users can double click anywhere on the poster to delete it - on the image, text or background.
- Look into
.closest()hint, hint
- Look into
- Ensure the poster is removed from your cleaned unmotivational posters data array first, and then update the DOM so that deleted poster is longer displayed.
- Remember that you should already have a function whose job it is to simply render all the cleaned unmotivational posters from your array onto the DOM. And the point of functions is to be reusable. hint, hint
Iteration 6 - Un-motivational Posters - Comp Matching
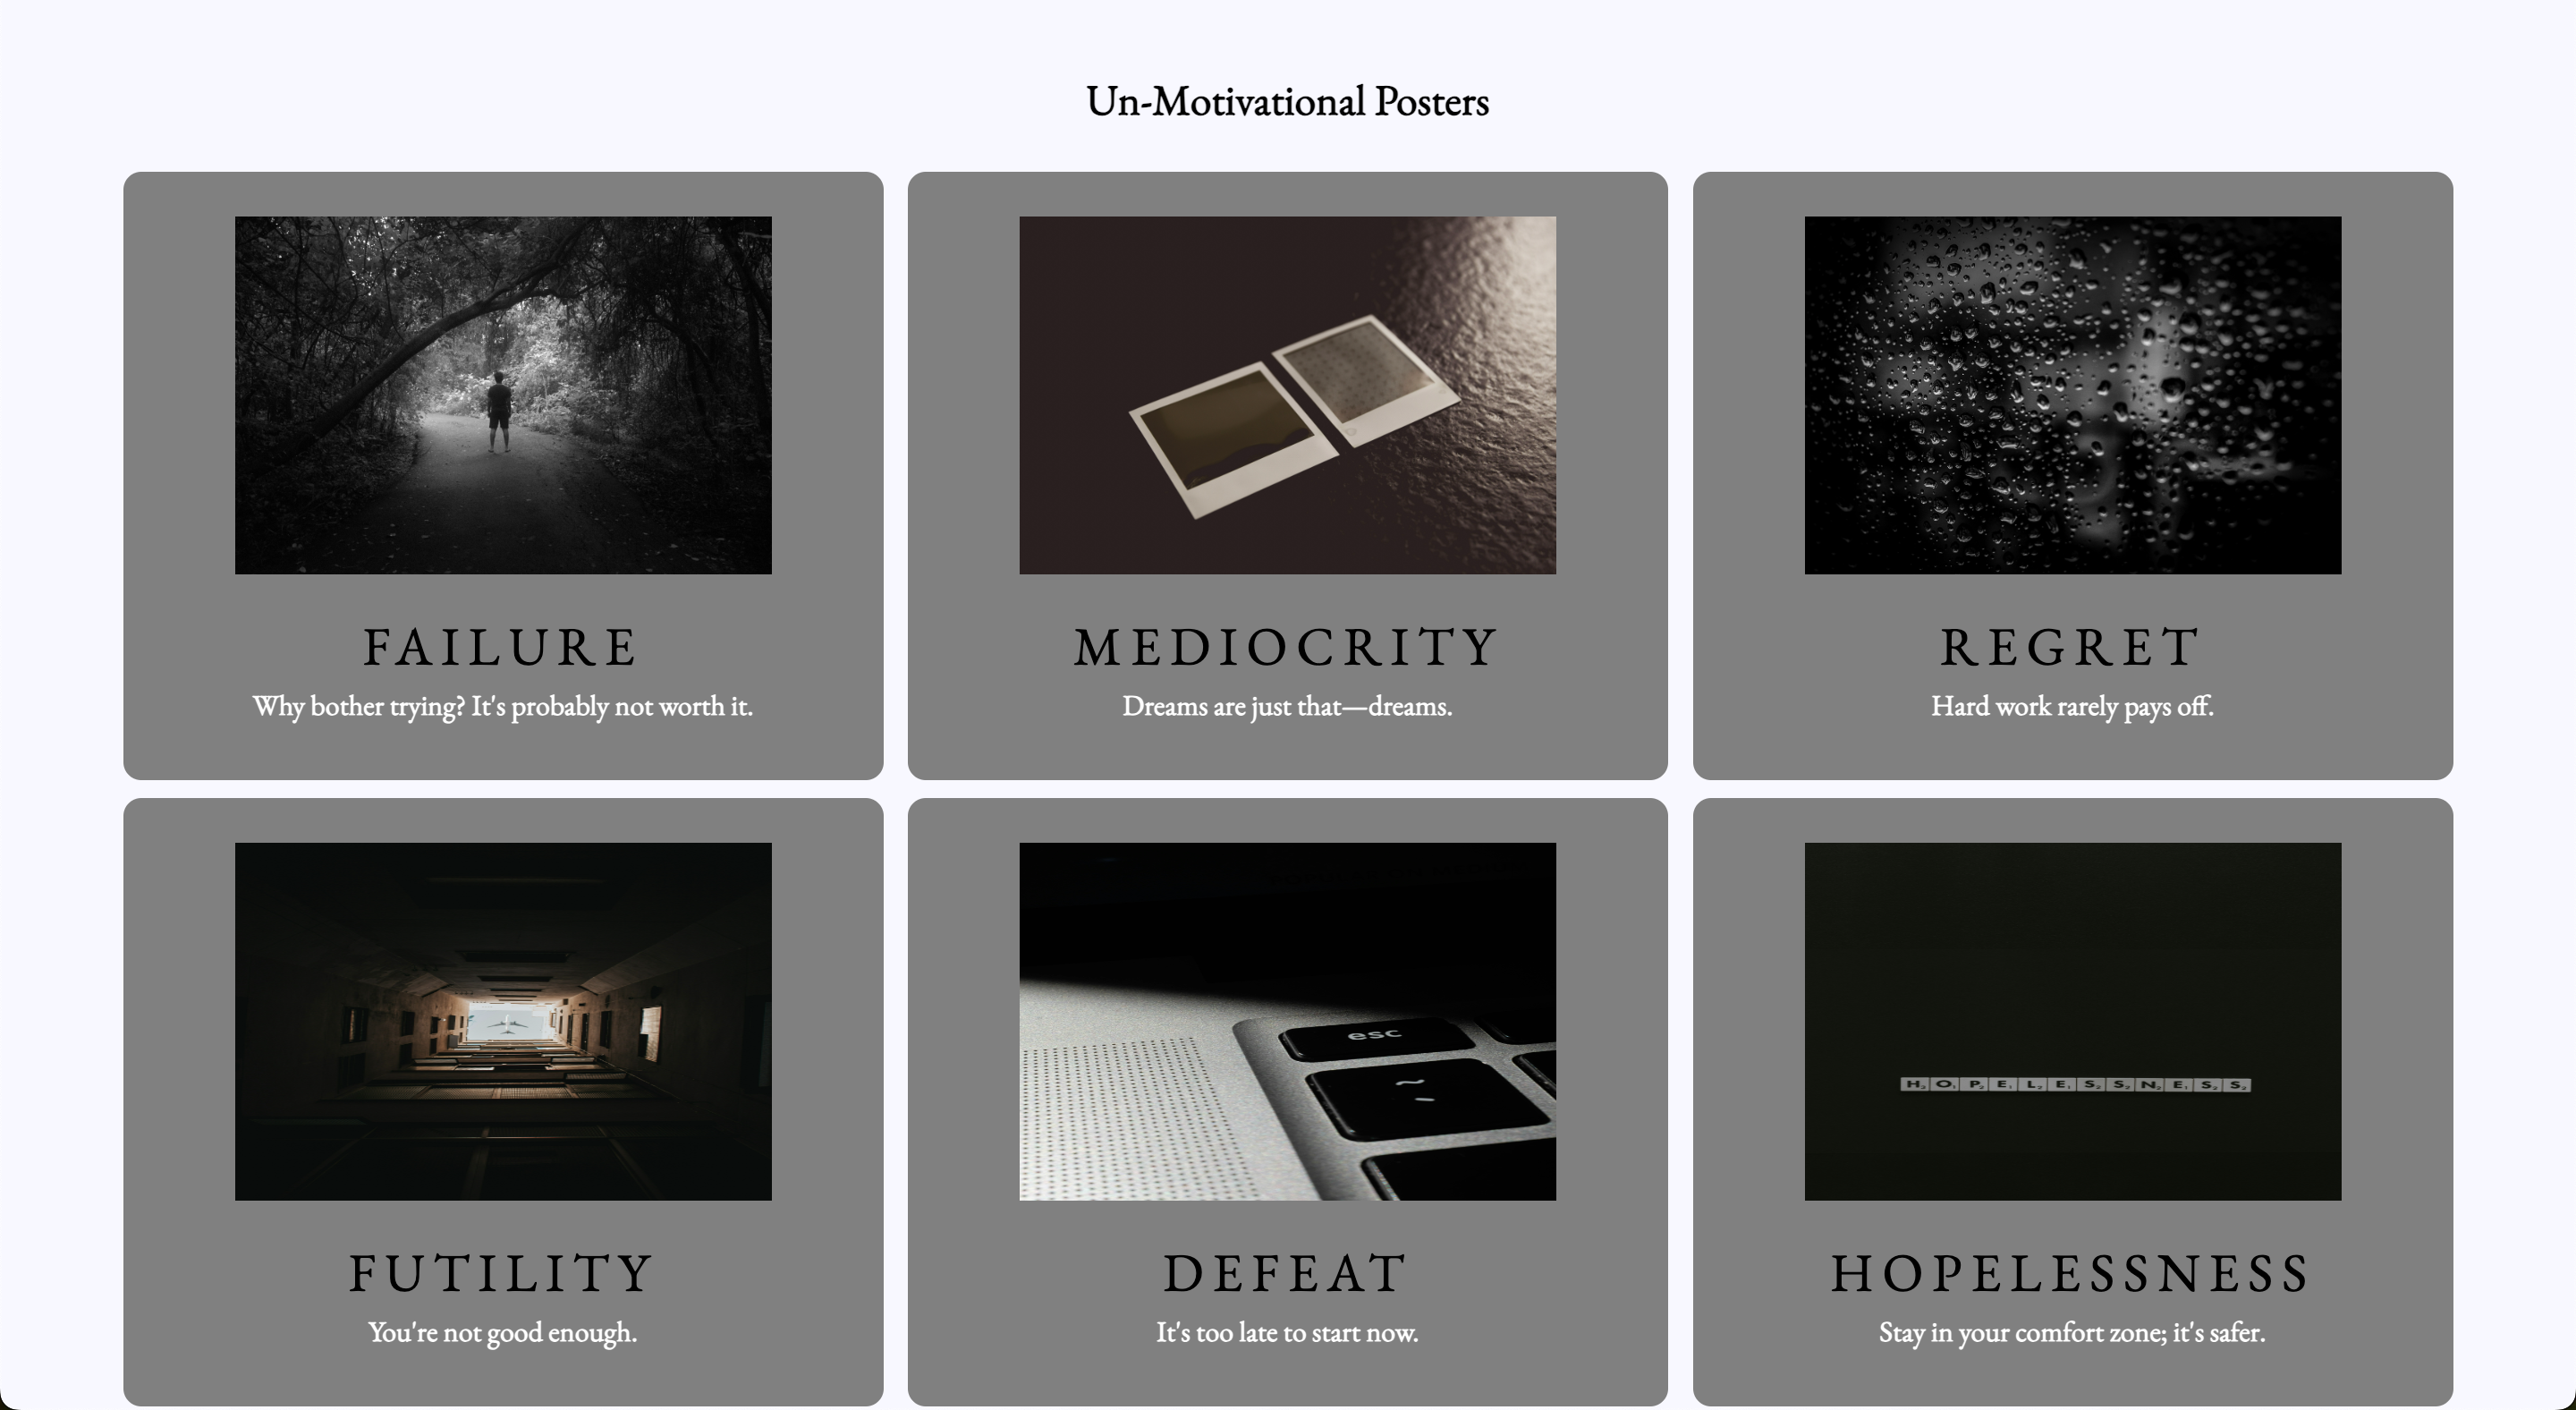
Unmotivational view (top of page):

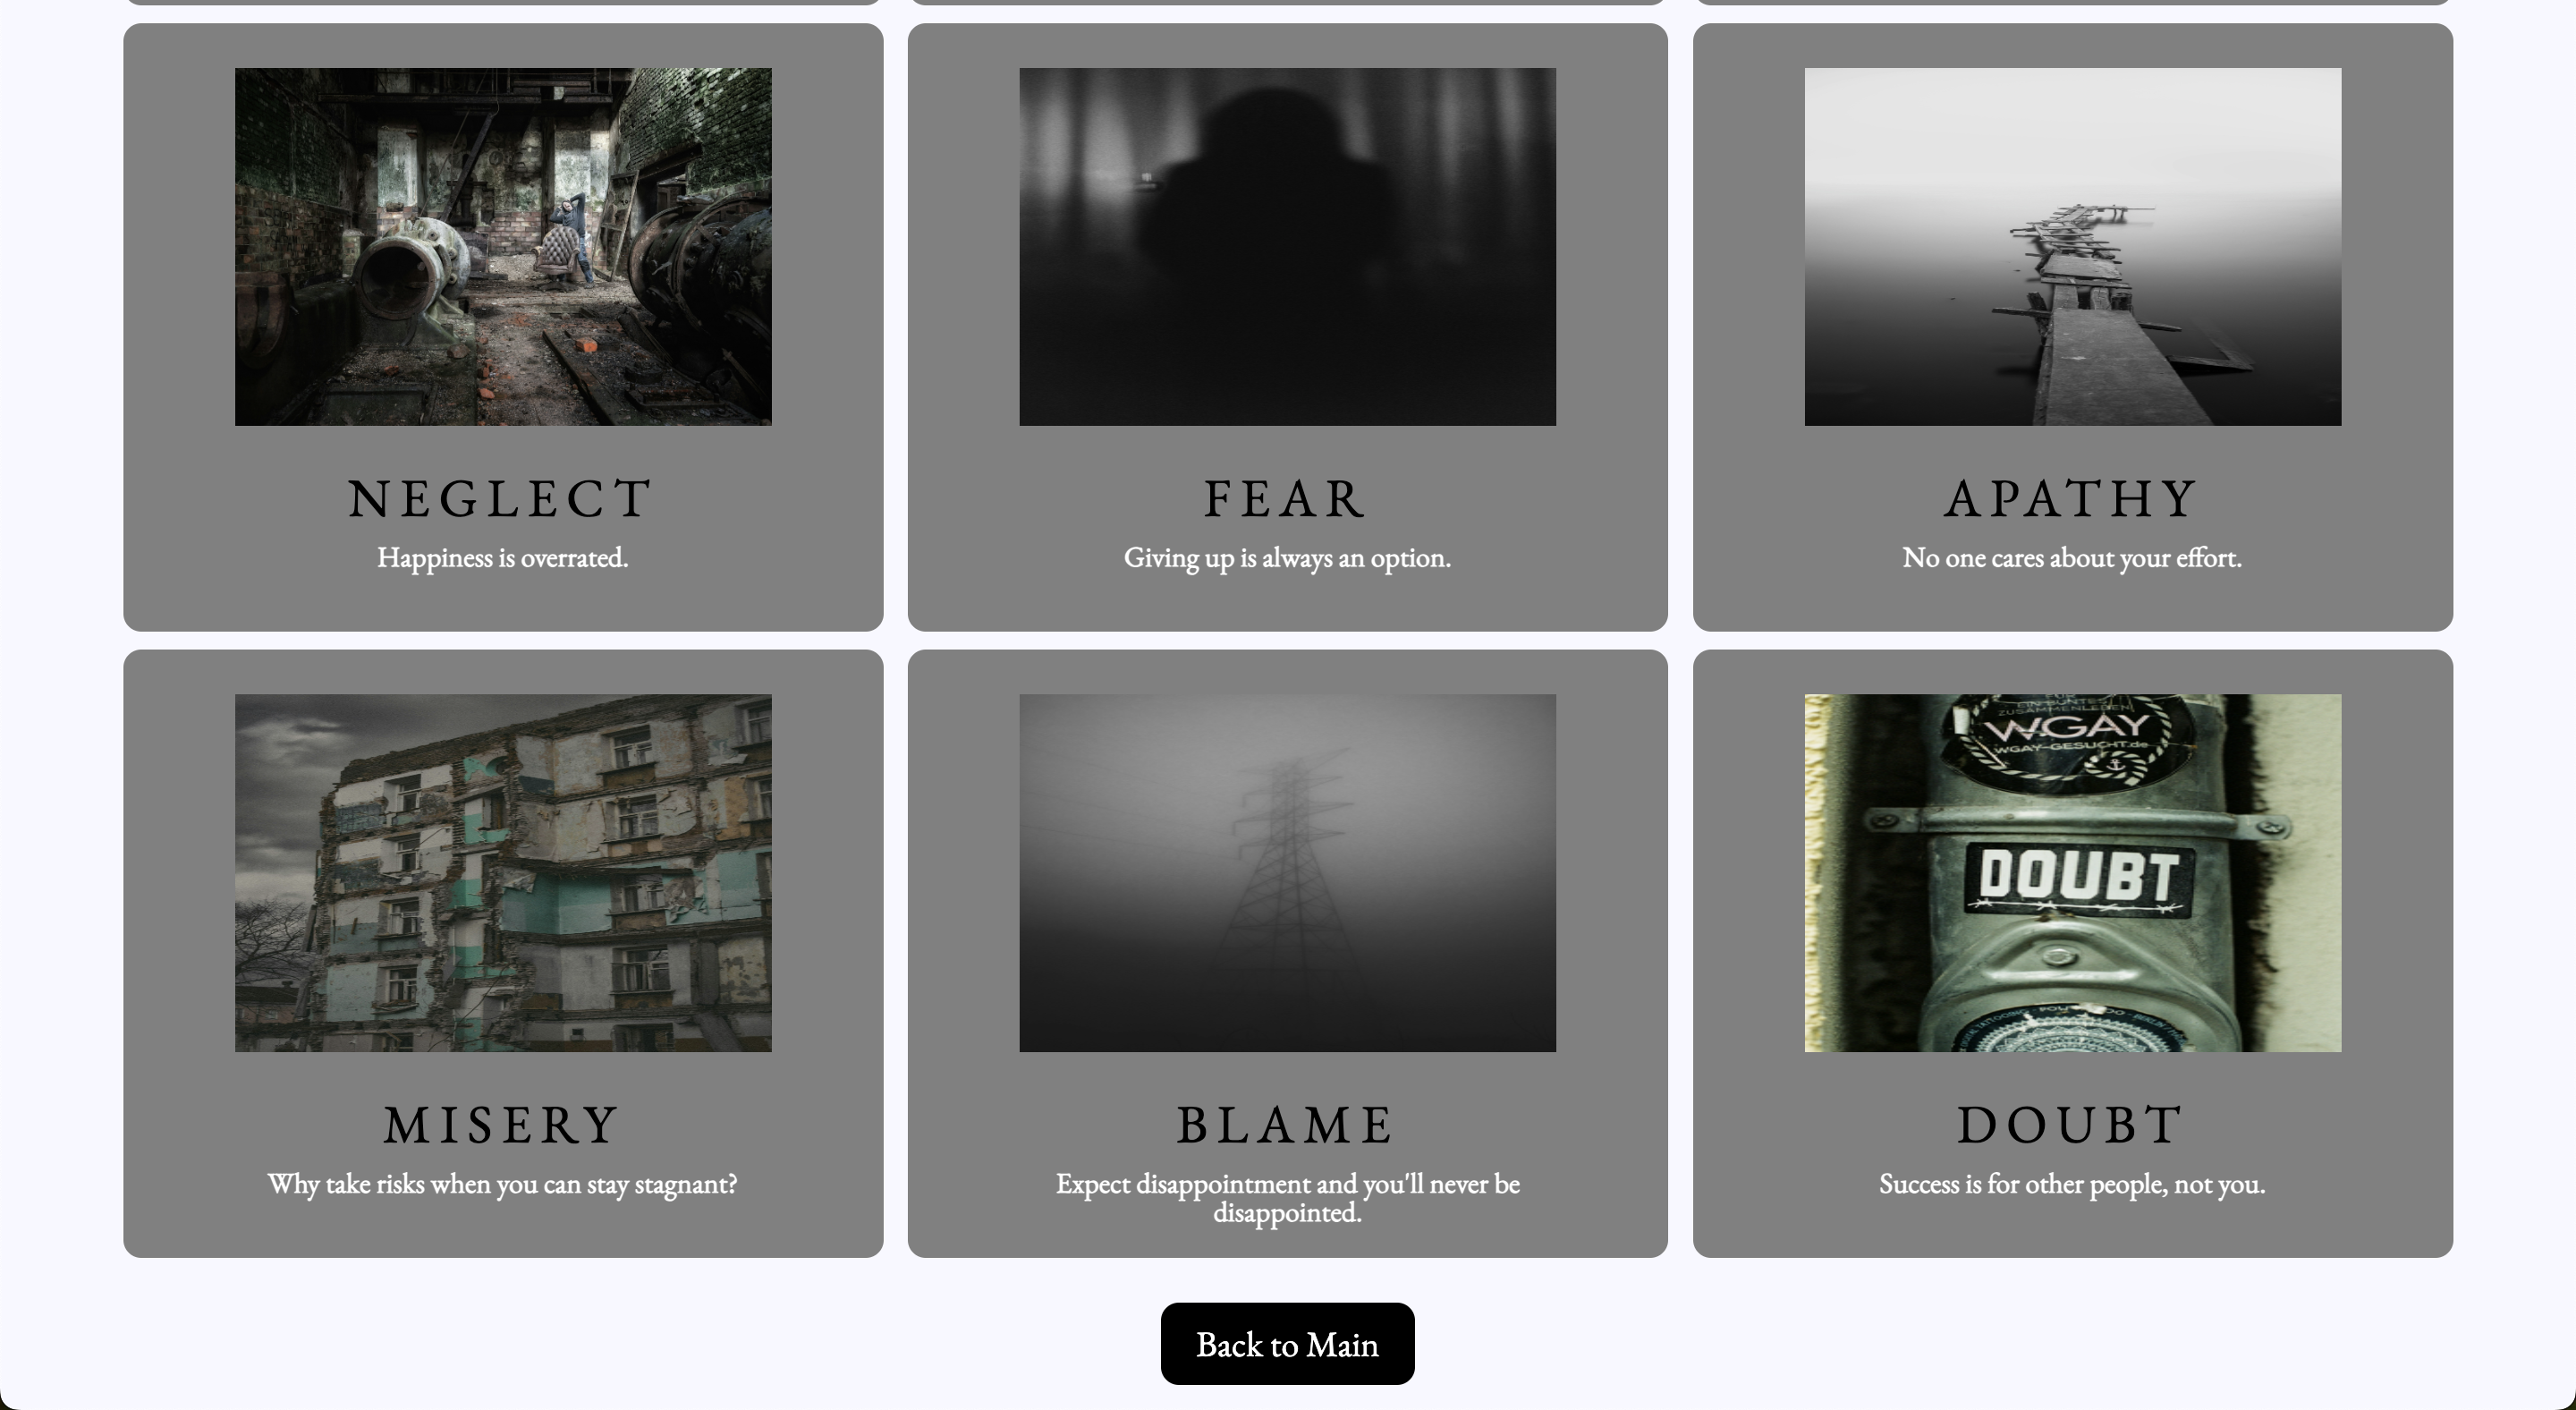
Unmotivational view (bottom of page):

- Using CSS, make the styling/format of the new “Unmotivational Posters” button (on the main page) and the “Back to Main” button (on the Unmotivational Posters page) match the other buttons throughout the app.
- Using CSS flexbox (not grid), control the layout of the unmotivational posters to match the comp provided here. Note: the number of posters you see in each row will flex based on the width of the screen, thats a good thing!
- Using CSS, make the style and size of the unmotivational posters match the comp provided here. You’ll notice they should look slightly different than the saved posters.
Hint:
Consider the existing html and css as you style this view. Are there places you can reuse existing classes/styling? Ensure your work doesn’t change the styling of the other parts of the app (like saved posters).
When you’re done, take a moment to see how the layout of the unmotivational posters flexes to adapt to the width available when you drag your dev console to be wider/narrower while on the unmotivational view. Compare that to the saved view which uses grid.
Optional Extensions
Here’s a list of possible extensions to implement - but ONLY IF your team has completed all the previous iterations AND have cleaned up your code to make it DRYer and more readable.
You are welcome to add your own extensions. Be sure they are thoughtful in terms of UX/UI, and that they do not break any prior functionality.
- Implement data validation and error handling into the form (disable button, provide error messages if data entered is not correct, etc)
- In the main poster view, allow users to click each piece of the poster (image, title, quote) to update just that piece with another random item from the appropriate array
- When a user single clicks a saved poster, create a modal to view it larger
- Allow users to drag and drop saved posters into whatever order they want them to appear
Additional detail is included in the pages below.
- Peer Code Review
- Evaluation Rubric
- Submission: Submission form link will be in the calendar event when the project is due.