Consultancy - Crafting User Stories
Introduction
Crafting atomic user stories that are independent and valuable can be challenging! It’s important to recognize that, as much as we might try, we are not going to craft perfect user stories right off the bat, and we should be open to the idea of slicing, splitting, and adjusting stories as we move through sprints. There’s nothing wrong with deciding with your team that a user story needs an update even when you’re working on the story or about to pick it up. A fundamental part of an agile practice is making these adjustments on the fly to respond to changing requirements or new information.
An Example
Let’s consider the following MVP for an application that will help students determine their overlapping work hours. The feature list could look like this:
Turing Timezone Coordinator
- account creation/simple login (without authentication, just assuming the role of an existing user)
- account creation involves: name, email, US timezone selection, worktime window (i.e. 8am - 7pm)
- create a new project and search for existing users to add to a project
- provide user with a report of the overlapping worktime hours based on everyone’s profile
- option to return to user’s profile to see saved projects and the saved reports of overlapping worktime
- strech goal: add a map display showing every teammate’s location? That would be cool!
Alright, so this is sounding like a hefty project, but let’s think about how we could break it down further! We’re going to think about this from both sides of the stack, but let’s start with the front end.
Splitting FE Stories
Typically, frontend stories can be split by features and distinct user flows. In order to see boundaries between these chunks of work, it can be helpful to convert the above MVP into traditional user story language: As a user, when I ___ (action), Then _____ (describe what happens)
This often requires having a bit more knowledge of your application’s user flow, so this is an activity that can be best completed after creating a user flow diagram, and starting on basic wireframes for your application.
Turing Timezone Coordinator
- #1: As a new visitor, when I click “Create Account”, I can create my own account with my email, timezone and worktime down.
- #2: As a returning visitor, when I click on the “Select User” dropdown, I can select my name from the dropdown of existing users, and then I will be redirected to my user profile, where I see my name, email, and worktime window (this is our version of “logging in”)
- #3: As a logged in user, when I’m on my profile page, I can click “Create Project” and I am taken to a form where I can enter the Project name, and select teammates who have profiles on this application. When I have added a name and selected the checkboxes for all my teammates, and then when I click “Create Project”, I’m taken to a Project Details page which shows the project info, and then lists the overlapping work time periods (listed in my timezone) for all the teammates on the team.
- #4: As a logged in user, when I’m on my profile page, then I can see all my saved projects. When I click on one of the project, I am directed to the project details page which shows the project info, and then lists the overlapping work time periods (listed in my timezone) for all the teammates on the team.
Having done this conversion, we start to see some different streams of work. This is a great start for 4 user stories on the front end. But, story #3 is pretty large and would be a great candidate for splitting into parts or phases. It’s not necessarily bad to keep a user story large as long as it still has boundaries and clear definitions of done. The benefit to breaking up large stories, however, can be to parallelize work and get code reviews on the smaller individual pieces.
Below are some strategies for splitting up large stories:
- Make original story “FE only” (exclude network calls) and separate out the display of response data from the server. The second story can include making the call and displaying any relevant response data
- Separate out sad path and error handling tasks into separate stories.
- Extract a spike that deals with an external API, or an unfamiliar tool, so that the research is done beforehand
- If there are two distinct paths a user could go down in your application (i.e. create account or log in, or search for hotels or rental cars), split stories by path rather than keeping both option’s flow in one user story.
By using these strategies, we could end up with the following list of FE user stories.
Turing Timezone Coordinator
- #1: As a new visitor, when I click “Create Account”, I can create my own account with my email, timezone and worktime down.
- #2: As a new visitor when I click “Create Account” and try to submit the form with missing data, or a non-unique email, I get a descriptive error telling me to try again.
- #3: As a returning visitor, when I click on the “Select User” dropdown, I can select my name from the dropdown of existing users, and then I will be redirected to my user profile, where I see my name, email, and worktime window (this is our version of “logging in”)
- #4: As a logged in user, when I’m on my profile page, I can click “Create Project” and I am taken to a form where I can enter the Project name, and select teammates who have profiles on this application (returned from a fetch from the BE). When I have added a name and selected the checkboxes for all my teammates, and then when I click “Create Project”, I’m taken to a Project Details page which shows the project info that I just entered on the previous page
- #5: As a logged in user, when I fill out the new project page, and click “Create Project”, the Project Details page shows me not only project details, but a list of overlapping worktime periods with my teammates. The overlapping periods are shown in my timezone. (Overlapping worktime periods come from the API response aftering POST-ing to the BE)
- #6: As a logged in user, when I’m on my profile page and I can click “Create Project”, when I click “Create Project” with invalid or missing data, I see an error telling me to fill out all necessary fields.
- #7: As a logged in user, when I’m on my profile page, then I can see all my saved projects. When I click on one of the project, I am directed to the project details page which shows the project info, and then lists the overlapping work time periods (listed in my timezone) for all the teammates on the team.
- #8: As a user, when I change the url in my browser to an invalid URL, I’m directed to a friendly error page that has a button I can click to go home.
Notice, we now have twice as many user stories, and there are no longer any obviously humongous stories that might cause churn. We could also keep splitting out some other tasks (like Cypress testing) and create a few additional stories, but you get the idea.
Additional Details
User stories don’t just contain one sentence. They might be sparse at the start of the project, but through project refinement meetings, you’ll likely add lots more details! Along with the user story language, your user stories should also have:
- information about whether a network call to your BE or an external API is necessary
- The BE endpoint doens’t need to be finished or functional yet! You can include the expected JSON response structure for the request and the response in order to use mock data in the application until the endpoint is finished.
- screenshots of relevant wireframes
- a list of Acceptance Criteria or a checklist of sub-tasks that must be complete in order to consider this story “done”. These could include any sad path scenarios included in the card, any expected testing, or notes about implementation details.
Prioritization and Parallelization
Note that these stories listed above probably shouldn’t be completed in order. At the beginning of every sprint, it’s important to have a discussion with your team about which stories are high priority. For example, if a team were choosing the first 3 stories to implement, it might be logical to start with #1 (account creation), #2 (user login) and #4 (project creation form). #4 can begin implementation at first without being connected to a specific user’s session.
It’s also helpful to take a look at stories at the beginning of each sprint and think about which stories could be worked on at the same time. Even if there are slight dependencies between stories, think about how you can utilize mock data, component skeletons (i.e. components without their full functionality built) and clear communication to parallelize some work.
Splitting BE Stories
With your MVP defined (for now - changes are okay!) with user story language, we can now start to think about what back-end functionality will be necessary in order to make the CRUD operations possible. An extended user flow diagram like the one shown below can be used to determine exactly which endpoints you might need.
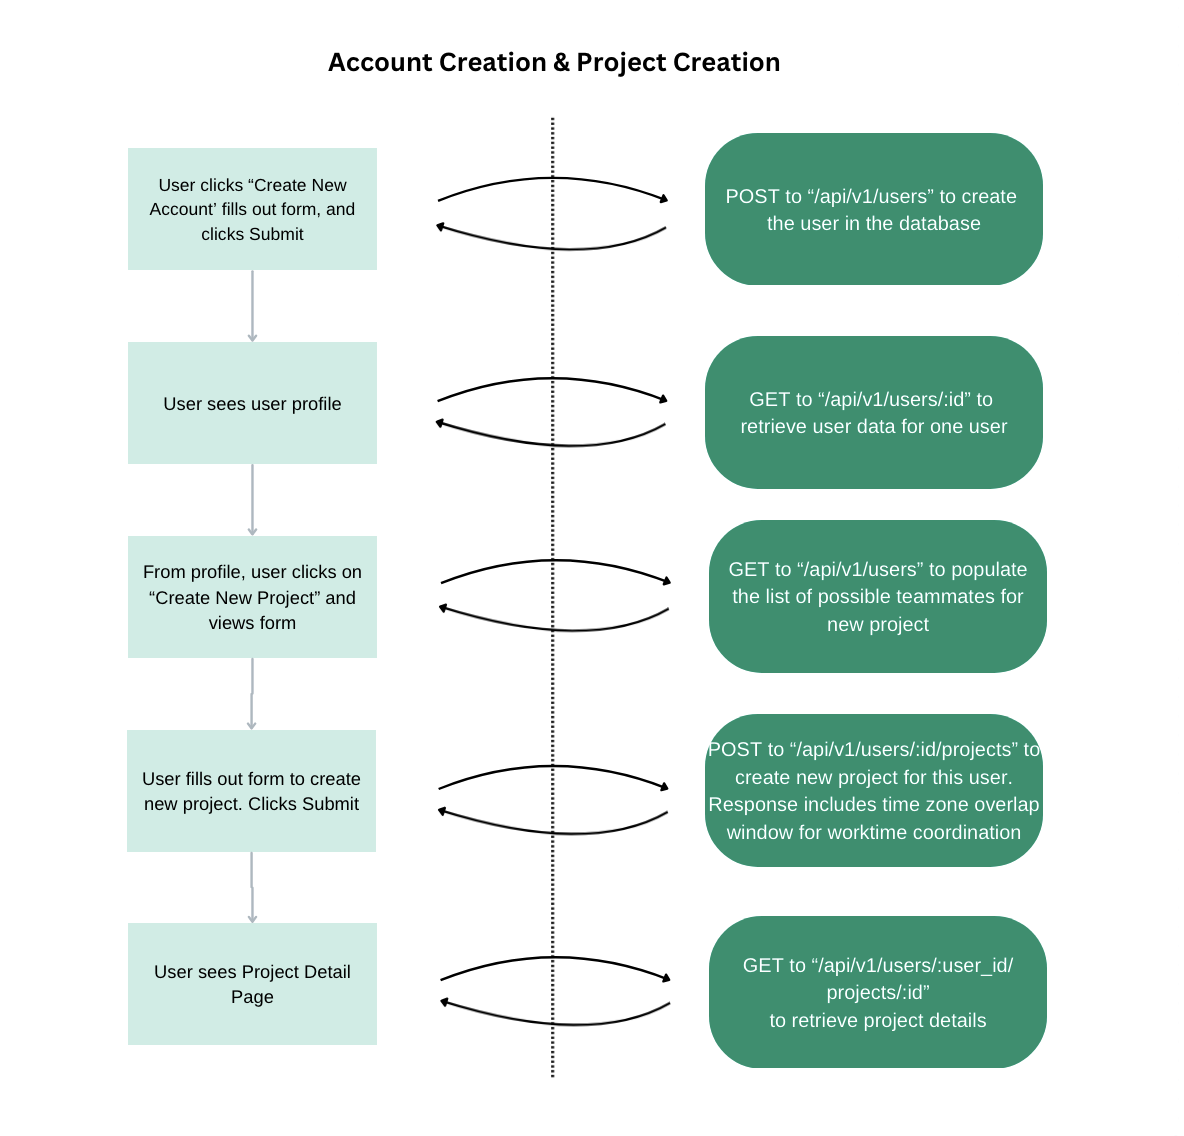
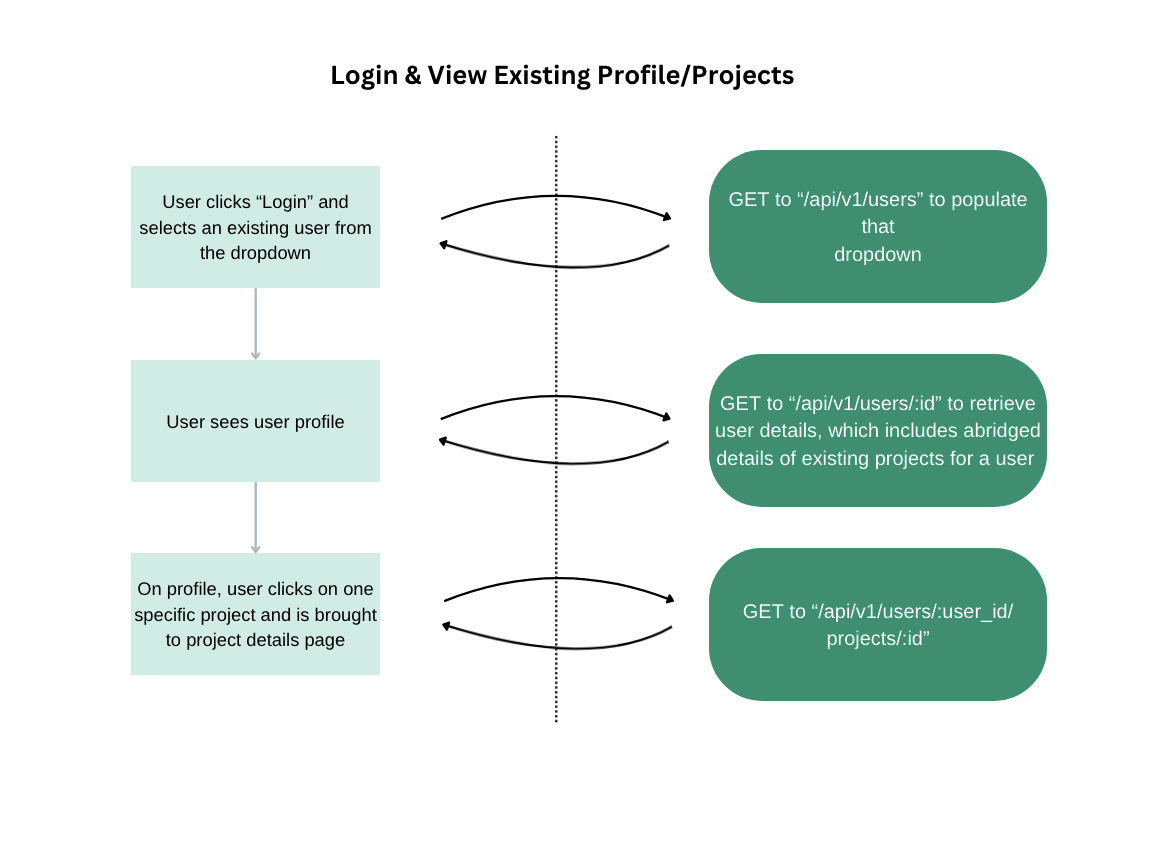
These diagrams illustrate two different user flows. You can make as many diagrams as you’d like as long as they combine to cover all the funcionality in your MVP. If we isolate just the back-end portion of these diagrams, we see the following endpoints/issues for our project board.
- POST to
api/v1/usersto create user - GET to
api/v1/users/:idto get user profile - GET to
api/v1/usersto get all users - POST to
api/v1/users/:id/projectsto create a new project for a user - GET to
api/v1/users/:user_id/projects/:idto get details for specific project
These are 5 good issues to start with on your project board. But, it’s important to include additional detail! For each BE ticket, you’ll want to include
- a description for how this endpoint will be used on the front end
- How/when the endpoint will be consumed by the front end
- Example request body
- Expected response body for both happy and sad path
- List of acceptance criteria (sub-tasks) that will be required as part of the issue (database updates, validations, sad path implementation, etc)
For any details you don’t have yet, make a placeholder in the card and make a note to come back to that detail once other planning artifacts are complete (make a sub-task on your project board to refine the details of these cards).
An example BE issue
Let’s take the first endpoint and build out the necessary details together.
POST to api/v1/users
Description: This endpoint will create a user in the database, and will be called on the FE after a user selects “Create Account”, fills out the details in the form, and clicks submit. In order to save a user, the BE will need an email, timezone and worktime window (start and end time) for the user.
Example Request:
{
  "user": {
    "email": "sample@test.com",
    "timezone": "CST",
    "worktime_window_start": "08:00:00 AM",
    "worktime_window_end": "08:00:00 PM"
  }
}
Example Response:
{
  "data": {
    "id": "1",
    "type": "user",
    "attributes": {
      "email": "sample@test.com",
      "timezone": "CST",
      "worktime_window_start": "08:00:00 AM",
      "worktime_window_end": "08:00:00 PM"
    }
  }
}
Note: For this MVP, only one simple worktime window is permitted. Users will not be able to enter more than one window (i.e. “8-4 and 6-8” will not be permitted for simplicity).
Acceptance Criteria
- Happy Path implemented and tested
- Sad Path implemented and tested: Request is missing necessary field; User creation fails with 422
- Sad Path implemented and tested: Times sent in request could not be parsed (bad format); User creation fails with 422
- Sad Path implemented and tested: Timezone sent is invalid; User creation fails with 422
Breaking Apart Big BE Issues
Let’s consider BE ticket #4. Based on the MVP of this application, this endpoint will likely need to include the calculation of what window of time all the group mates have overlapping. This is a hefty piece of logic, and if it’s included in a ticket that also includes sad paths and testing like the POST request above, that will be a huge piece of work!
Just like FE user stories, BE user stories/tickets can be broken up as well. #4 is a great candidate. Consider splitting it up into the following two issues:
#4a: POST to api/v1/users/:id/projects just to save record
- includes sad path considerations when not all project fields are included or valid
- includes creating record in projects database table
- response includes project fields, and NO timezone calculation
#4b: Enhance POST request to include overlapping time zone calculation in response
- overlapping timezone window added to database table as a new column
- model method retrieves time zone and work window for each user in project and calculates overlap
- response extended to include the calculation
While ticket #4b requires some of #4a to be complete, the work on the calculation logic could absolutely begin while #4a is still in progress. Parallalizing this work would be a helpful tool for efficient development.